Overview
The agentex-agents repository template ships with three Gitea Actions workflows that automate the build and deploy lifecycle for your agents. These workflows use the SGP Build and Deploy API to package your agent source code into container images and deploy them to SGP-managed Kubernetes clusters. Out of the box, merging tomain triggers an automatic build and deploy. Pushes to feature branches trigger build-only validation. You can also trigger builds and deploys manually via workflow dispatch.
You do not need to write these workflows from scratch. The template repository includes them pre-configured. Your responsibility is to understand when each workflow runs, how to configure your agent directories, and how to set up the required secrets.
How it works
When you push code that changes an agent, the CI/CD pipeline detects the change, builds a container image, and (on the main branch) deploys it. The following diagram shows the end-to-end flow for a merge to main: The pipeline auto-detects which agents changed by runninggit diff against the previous commit. Only agents with modified files are built, so a single push that touches multiple agents triggers parallel builds for each one.
The three workflows
The template repository includes three workflow files under.gitea/workflows/. Each serves a different purpose in the development lifecycle.
cloud-build.yaml: build on feature branches
This workflow triggers on pushes to any branch except main when files underteams/**/agents/** change. It auto-detects which agents were modified, packages the build context for each one, and submits a build request to the SGP Build API via POST /v5/builds. The workflow polls the build status until it succeeds or fails, with a 600-second timeout.
This workflow does not deploy. Its purpose is to validate that your agent builds successfully before you merge.
cloud-build-and-deploy-on-push.yaml: build and deploy on main
This workflow triggers when files underteams/**/agents/** change on the main branch, or via manual dispatch. It builds container images for all changed agents and then deploys them.
For each agent, the workflow:
- Packages the build context based on the agent’s
manifest.yamlbuild configuration - Submits the build to
POST /v5/buildsand polls until complete - Reads the agent’s
manifest.yamlandenvironments.yaml - Submits a deployment to
POST /v5/agentex/deploymentswith the resultingbuild_id - Polls the deployment status until it reaches
healthyor fails
resolve_inputs.py helper script to derive the image name from the agent.name field in the manifest and to auto-select the environment from environments.yaml (auto-selected when only one environment is defined, which is the typical case).
cloud-deploy.yaml: standalone deploy
This workflow is manual-only. It deploys an existing image without rebuilding. You can trigger it via manual dispatch or call it from another workflow usingworkflow_call.
Inputs include:
agent-path(required): path to the agent directoryagent-environment(required): environment key fromenvironments.yamlbuild-idORimage-name+image-tag: specify either a previous build ID or a direct image reference
POST /v5/agentex/deployments, polls until the deployment is healthy, and fetches deploy logs on failure.
Workflow runs
After a workflow triggers, you can monitor its progress in the Gitea Actions UI. Each workflow run shows the individual steps, their status, and logs for each stage of the build and deploy process.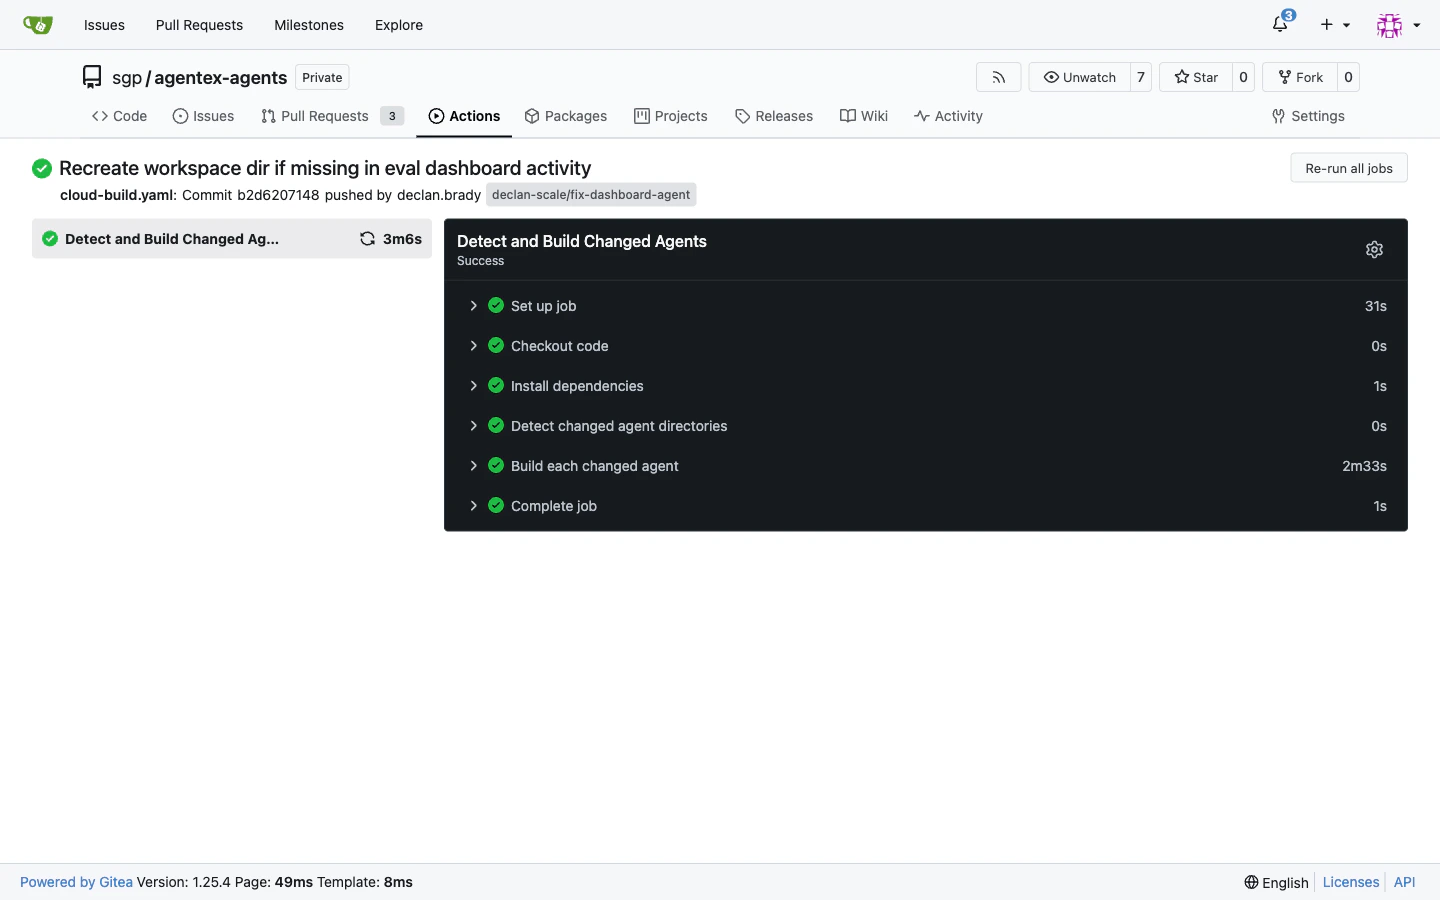
- Each step in the pipeline with pass/fail indicators
- Timing information for build and deploy phases
- Console output for debugging failed steps
Manual dispatch
You can trigger a build and deploy for a specific agent without pushing code by using the manual dispatch form in Gitea Actions.
- Navigate to the Actions tab in your Gitea repository
- Select the
cloud-build-and-deploy-on-push.yamlworkflow (orcloud-deploy.yamlfor deploy-only) - Click Run workflow
- Fill in the inputs:
- agent-path (required): the path to your agent directory (for example,
teams/my-team/agents/my-agent) - image-name (optional): overrides the image name derived from
manifest.yaml. Should match theagent.namein your manifest. - agent-name (optional): overrides the agent name. Should match
image-name(theresolve_inputs.pyhelper sets both to the same value by default). - image-tag (optional): overrides the auto-generated tag. Use a version number (e.g.,
v1.2.0) or a commit SHA. Defaults to the current commit SHA. - agent-environment (optional): must match an environment key in your
environments.yaml. Auto-selected when only one environment is defined.
- agent-path (required): the path to your agent directory (for example,
- Click Run workflow to start the pipeline
Manual dispatch is useful during initial setup, testing, or when you need to deploy a specific image tag. For routine development, merging to main triggers the build and deploy automatically.
Repository structure
The CI/CD workflows expect a specific directory layout. Each agent lives in its own directory underteams/<team>/agents/<agent-name>/ and contains the configuration files the workflows need.
teams/**/agents/** path level. When you push a commit that modifies any file inside an agent directory, the corresponding workflow picks up that agent for building.
manifest.yaml
Themanifest.yaml file defines your agent’s identity, build context, credentials, and deployment defaults. It is the primary configuration file the CI/CD workflows read when building and deploying your agent.
Key fields
build.context controls what files are sent to the cloud build service. Set root to the common ancestor directory, then use include_paths to specify which subdirectories to include. The dockerfile and dockerignore paths are relative to root.
agent defines the agent’s identity and runtime configuration:
acp_typedetermines whether the agent uses synchronous request-response (sync) or asynchronous task-based (async) communication.nameis used as the default image name and must be unique within your account.temporalconfigures Temporal workflow settings for async agents. Each workflow entry specifies the workflow class name and task queue.credentialsmaps secrets stored in SGP to environment variables in the running container. Each entry references a secret by name and key, and injects it as the specified environment variable. See Secrets for how to create and manage these secrets.
deployment sets default resource requests and replica counts. These values can be overridden in environments.yaml.
The
deployment.image.repository field is intentionally left empty. The CI/CD pipeline populates it automatically with the managed registry path during the build phase.environments.yaml
Theenvironments.yaml file defines deployment settings for your agent’s target environment: the Kubernetes namespace, authentication principal, resource limits, and Helm value overrides.
The file has a top-level environments map with a named key for each environment. In practice, you define one environment per agent. The key name (e.g., dev.aws below) is arbitrary; the CI/CD pipeline’s resolve_inputs.py helper auto-selects it when only one environment is defined.
Key fields
kubernetes.namespace determines where the agent’s pods, services, and other resources are created.
auth.principal provides the user_id and account_id used to authenticate API calls. These must correspond to a valid SGP service account with permissions to create deployments.
helm_overrides lets you customize the container command, resource requests and limits, replica counts, Temporal worker configuration, and environment variables. Values specified here take precedence over the defaults in manifest.yaml. The env field uses array format ([{name: X, value: Y}]) for environment variables injected into the running container.
Required secrets
The CI/CD workflows authenticate with the SGP API using secrets stored in your Gitea repository’s Actions settings. You must configure the following secrets before the workflows can run.
To add these secrets:
- Navigate to your Gitea repository settings
- Go to Actions > Secrets
- Add
SGP_API_KEYwith your SGP API key value - Add
SGP_ACCOUNT_IDwith your account ID
The workflows use the in-cluster API base URL
http://egp-api-backend.egp.svc.cluster.local/public by default. This is pre-configured in the workflow files and does not require a separate secret. If your cluster uses a different service address, update the SGP_BASE_URL variable in the workflow files directly.manifest.yaml. Repository secrets authenticate the CI/CD pipeline itself, while agent secrets (in the credentials section of manifest.yaml) are injected into the running agent container at runtime.
Adding a new agent
To add a new agent to the CI/CD pipeline:-
Create the agent directory under your team’s path:
-
Add a
manifest.yamlwith your agent’s build context, name, and configuration. Use the example above as a starting point and update theagent.name,build.contextpaths, andcredentialssection for your agent. -
Add an
environments.yamlwith your deployment target configuration. Set thenamespace,auth.principal, and anyhelm_overridesfor your environment. -
Add a
Dockerfileand.dockerignoreat the paths referenced in yourmanifest.yaml. The Dockerfile should produce a container that runs your agent. -
Add your agent source code under
src/or wherever your Dockerfile expects it. -
Push to a feature branch to trigger
cloud-build.yaml. Verify that the build completes successfully in the Gitea Actions UI. -
Merge to main to trigger
cloud-build-and-deploy-on-push.yaml, which builds the agent and deploys it automatically using the configuration inenvironments.yaml. -
Verify the deployment in the SGP dashboard. Navigate to your agent’s detail page to confirm the deployment status is
healthy.
Next steps
- API and SDK: access builds and deployments programmatically
- sgpctl CLI: build, deploy, and inspect agents from the terminal
- Secrets: create and rotate credentials referenced in
manifest.yaml