> ## Documentation Index
> Fetch the complete documentation index at: https://docs.gp.scale.com/llms.txt
> Use this file to discover all available pages before exploring further.
# Translation Evaluation
> How to create and evaluate a translation application.
Many use cases for GenAI applications follow a translation pattern, where the input is a string or document in original language and the output is the translation, with an optional "expected translation".
These patterns are natively supported with Flexible Evaluation runs. In this guide, we walk the creation of translation evaluations step by step.
# Application Setup
Evaluations are tied to an external application variant. You will first need to [initialize an external application](/docs/external-applications) before you can evaluate your application.
To create the variant, navigate to the "Applications" page on the SGP dashboard, click **Create a new Application**, and select **External AI** as the application template.
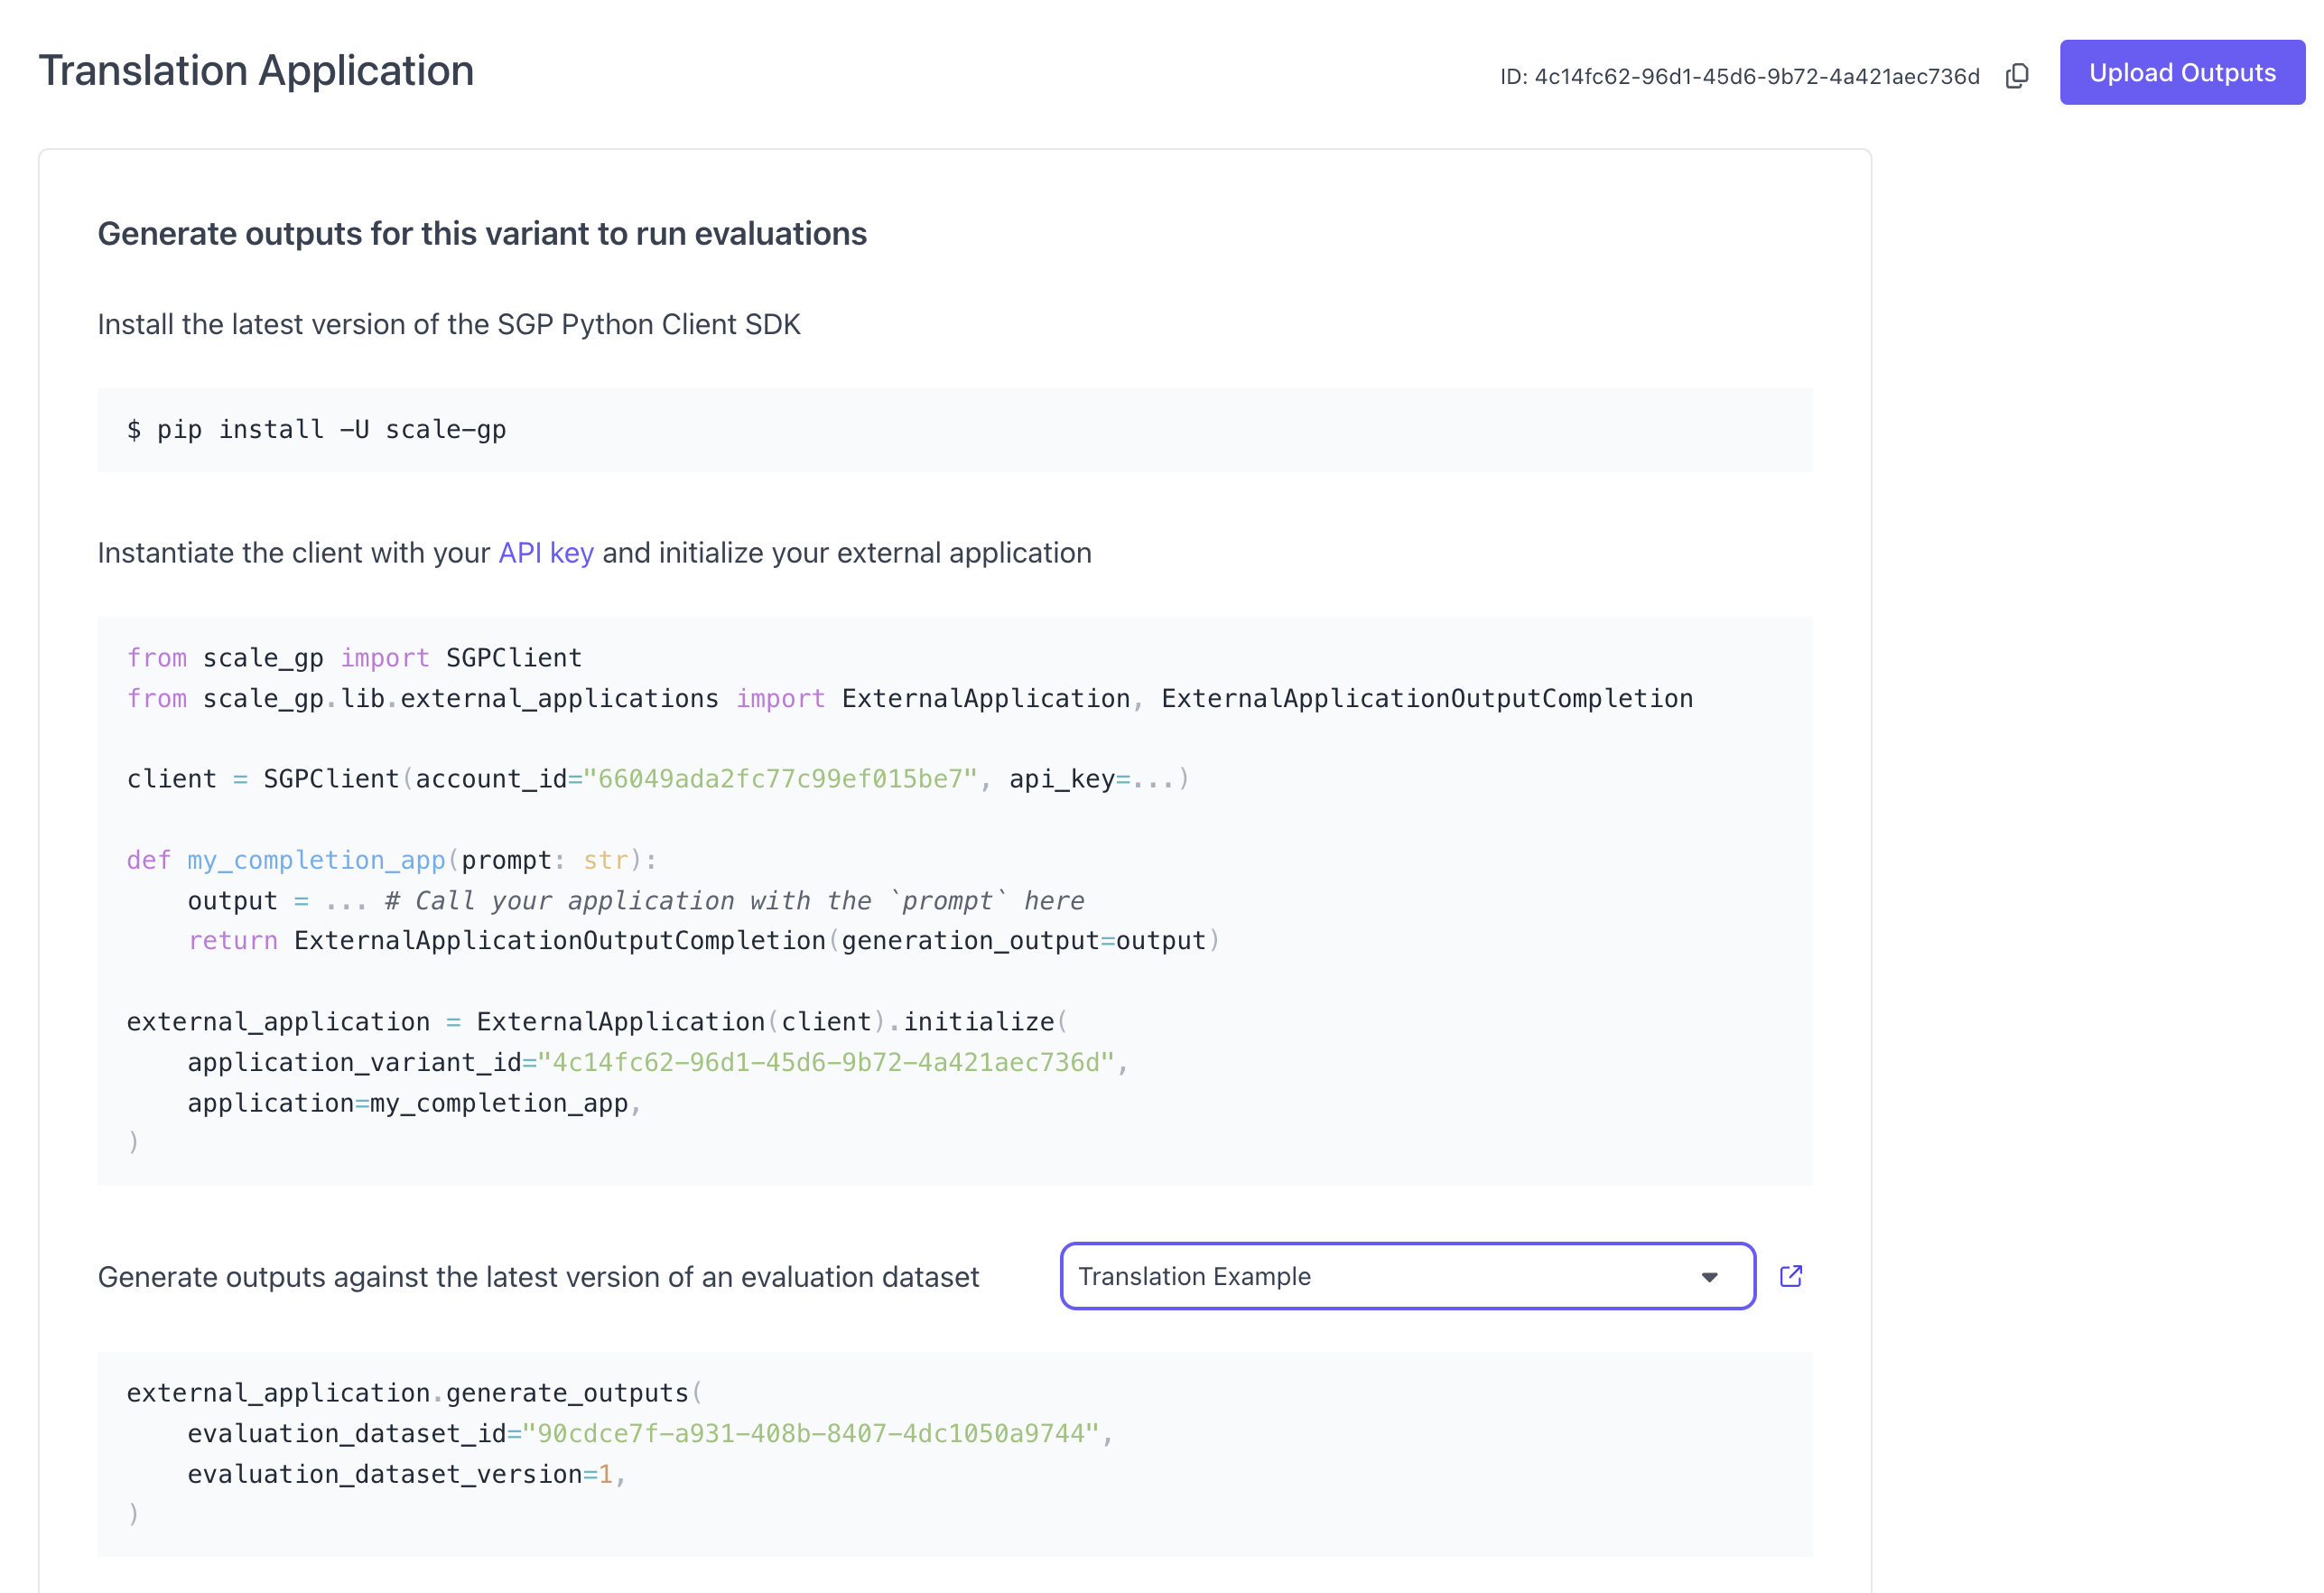
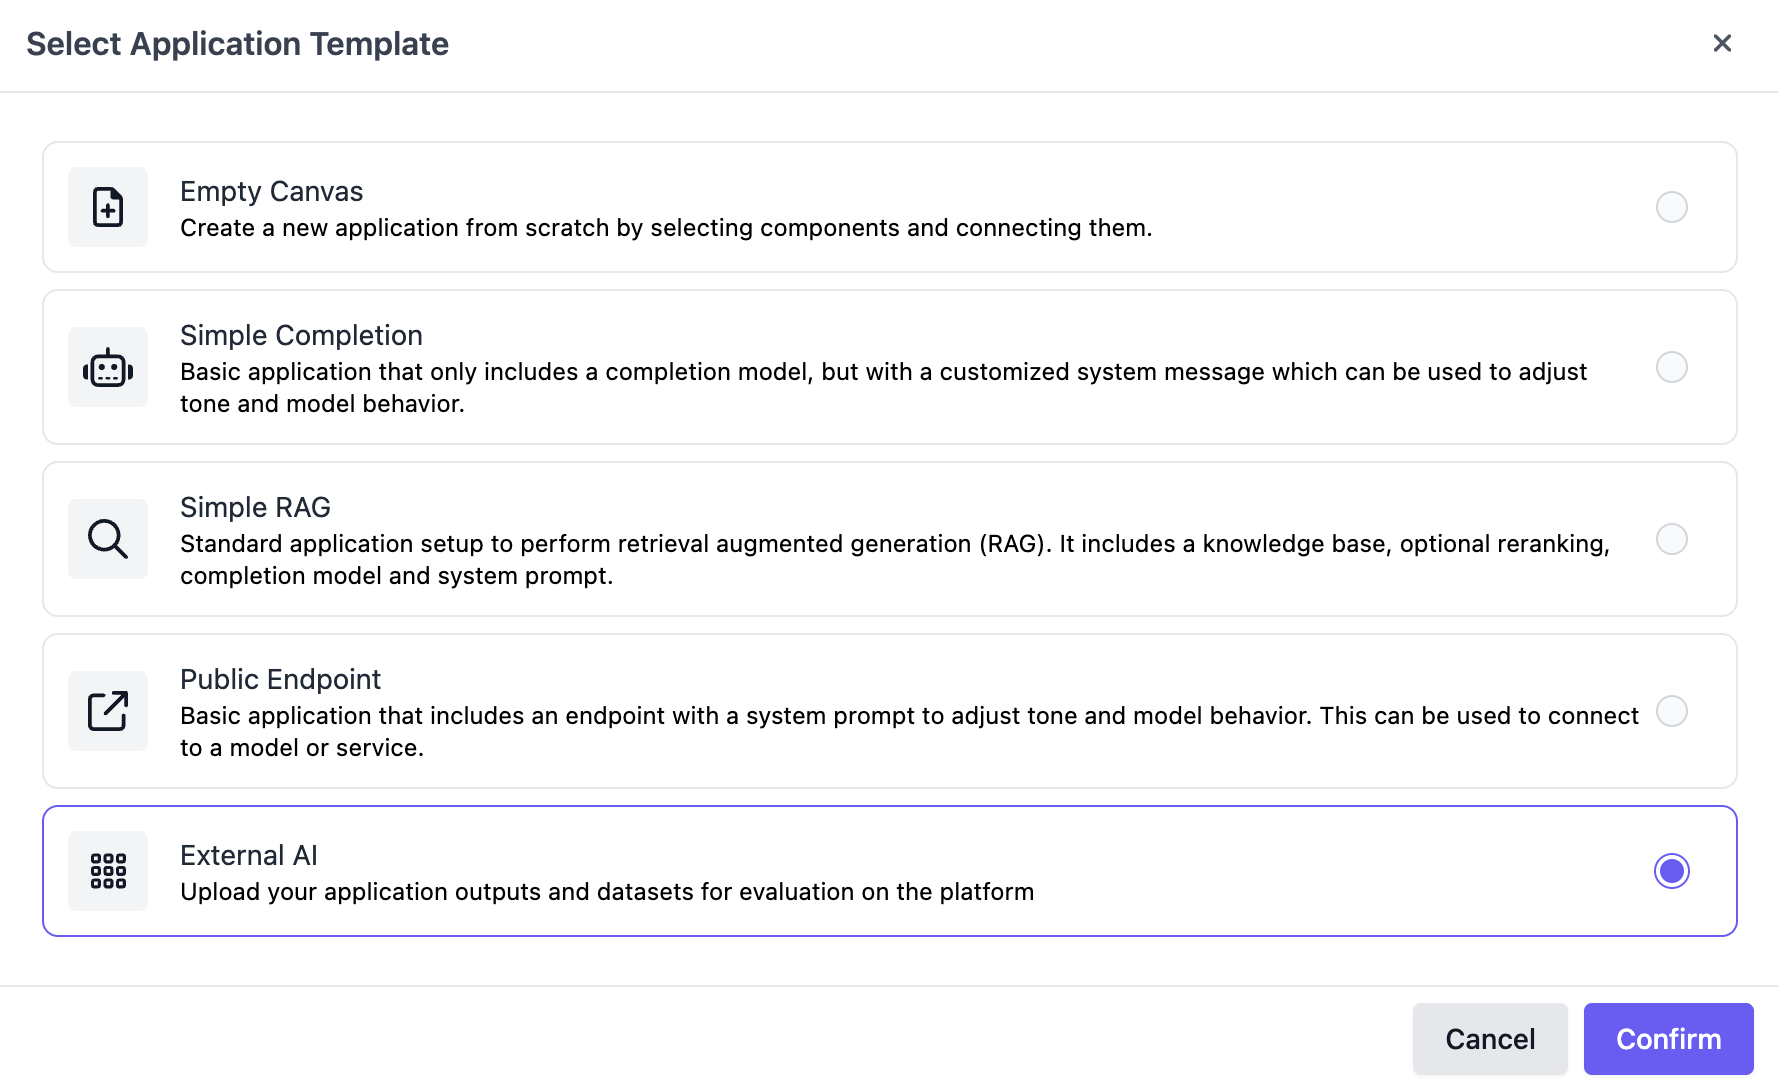 You can find the `application_variant_id` in the top right:
 # Translation Evaluation using the UI
## Create Evaluation Dataset
First, we need to set up an a translation evaluation dataset. To do this, we can navigate to the "Evaluation Datasets" page in the left hand navigation and hit "Create Dataset" in the top left, chosing "Manual Uplaod".
# Translation Evaluation using the UI
## Create Evaluation Dataset
First, we need to set up an a translation evaluation dataset. To do this, we can navigate to the "Evaluation Datasets" page in the left hand navigation and hit "Create Dataset" in the top left, chosing "Manual Uplaod".
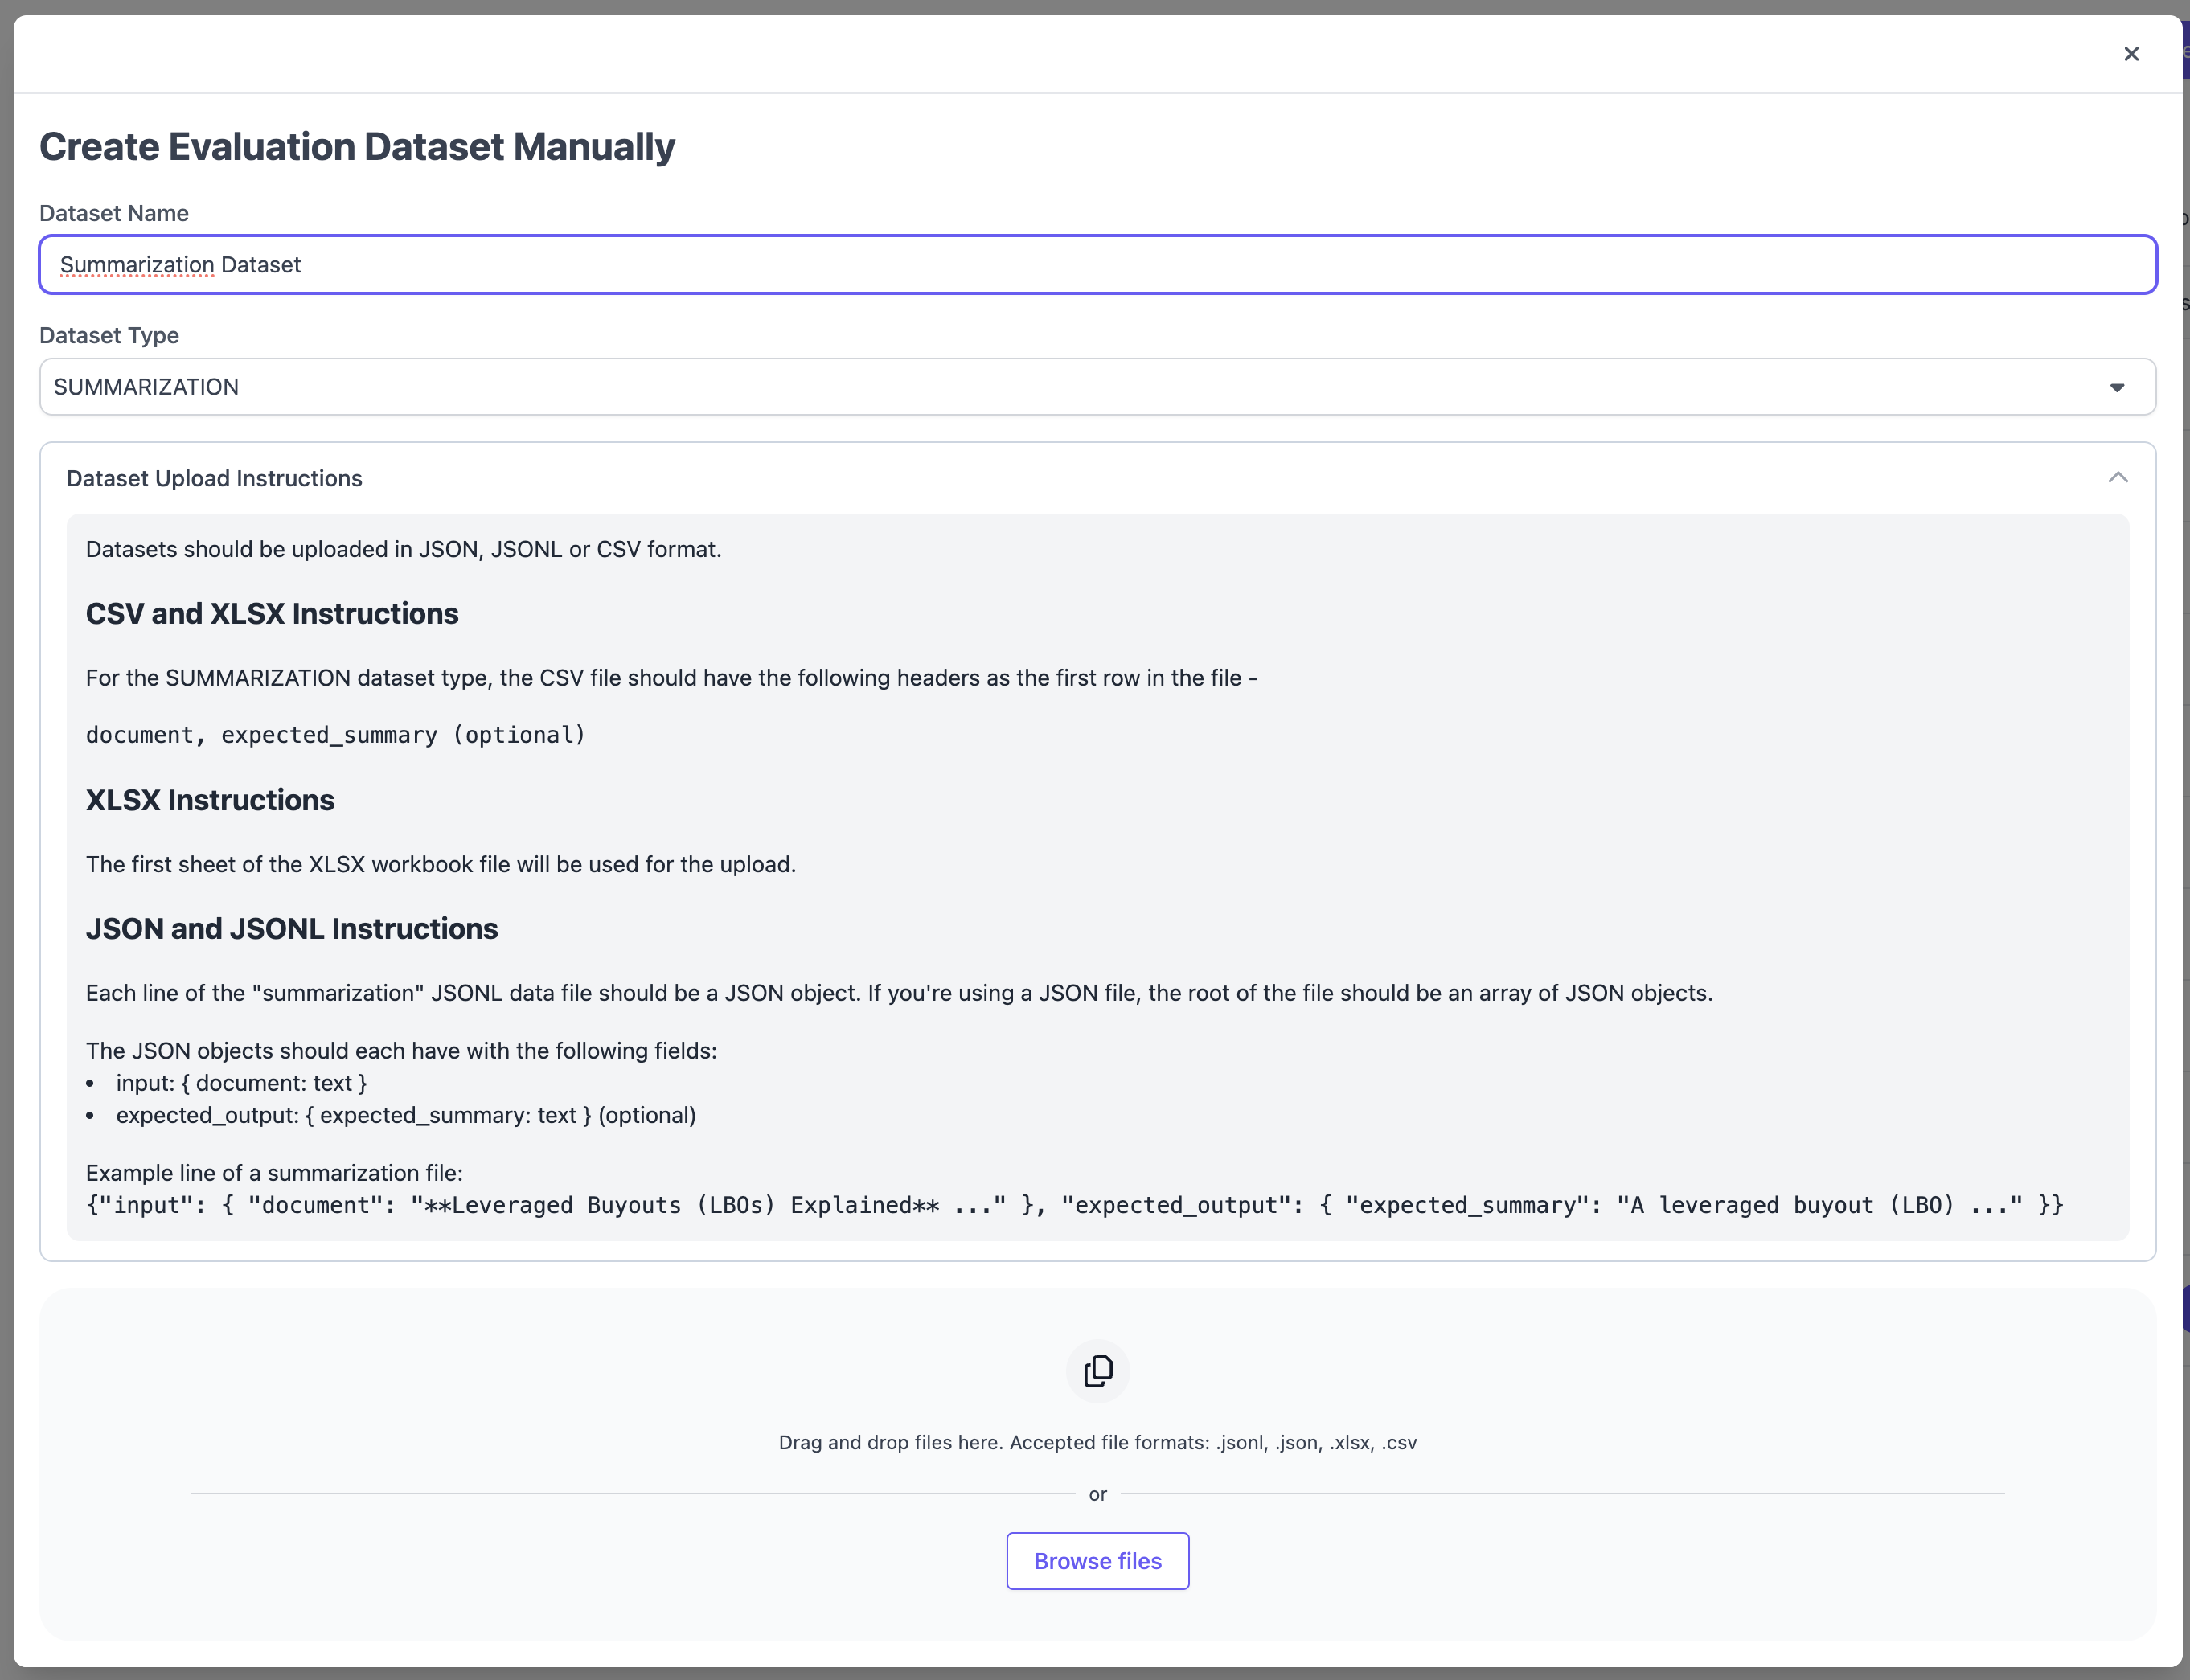
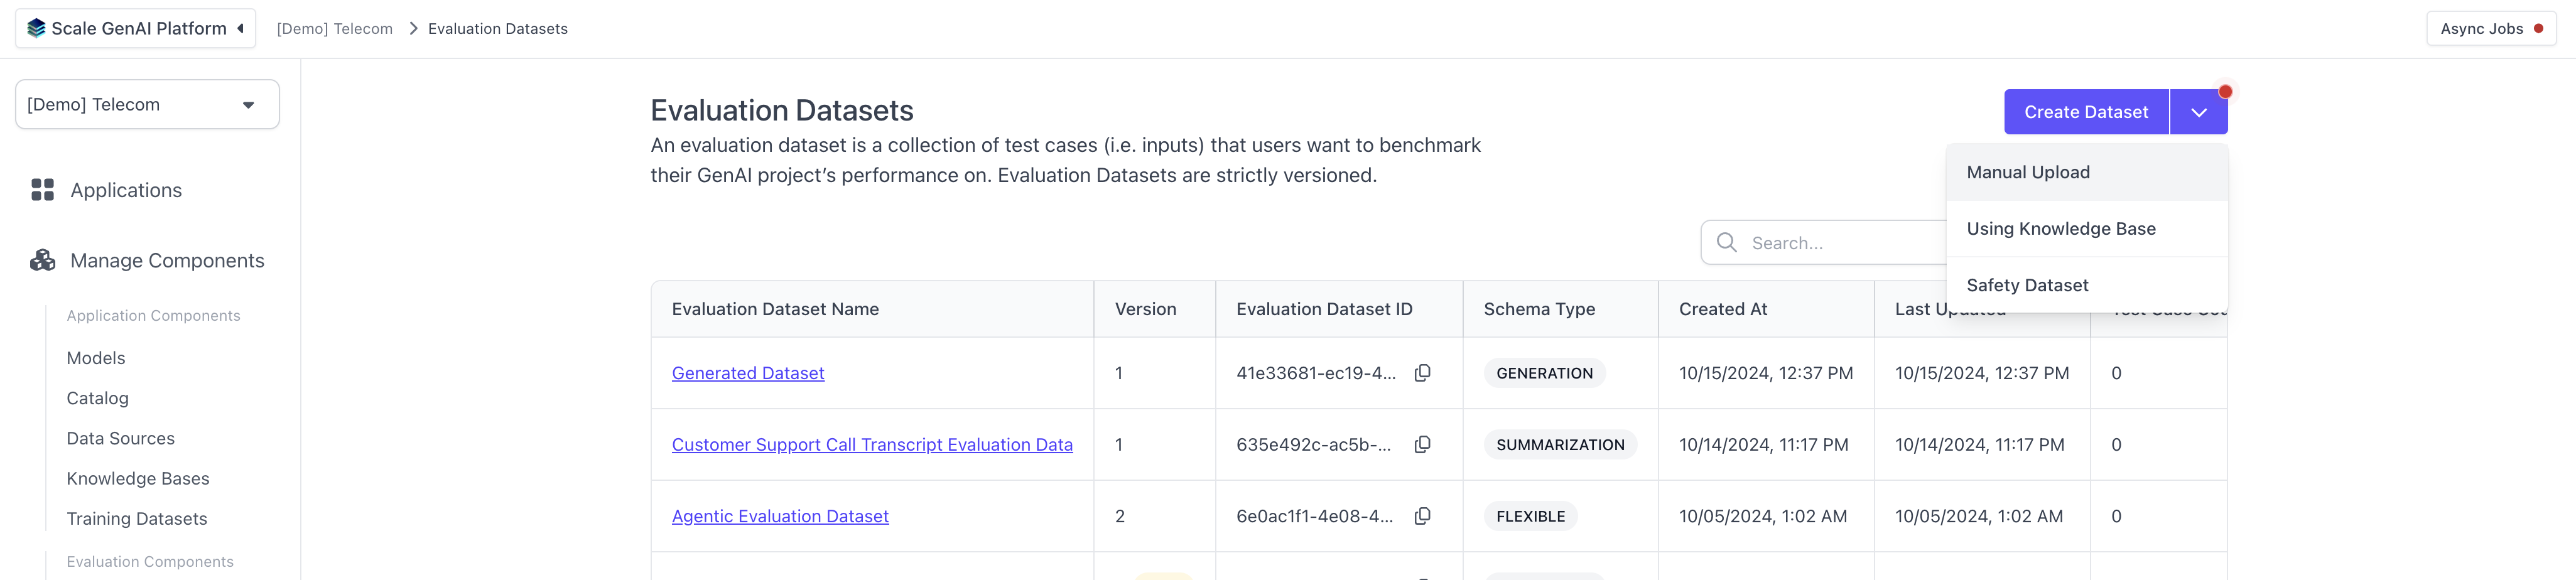 In the following modal, select Dataset Type `TRANSLATION` and follow the formatting instructions. Supported file types include `CSV`, `XSLX`, `JSON` and `JSONL`.
 ## Upload Outputs
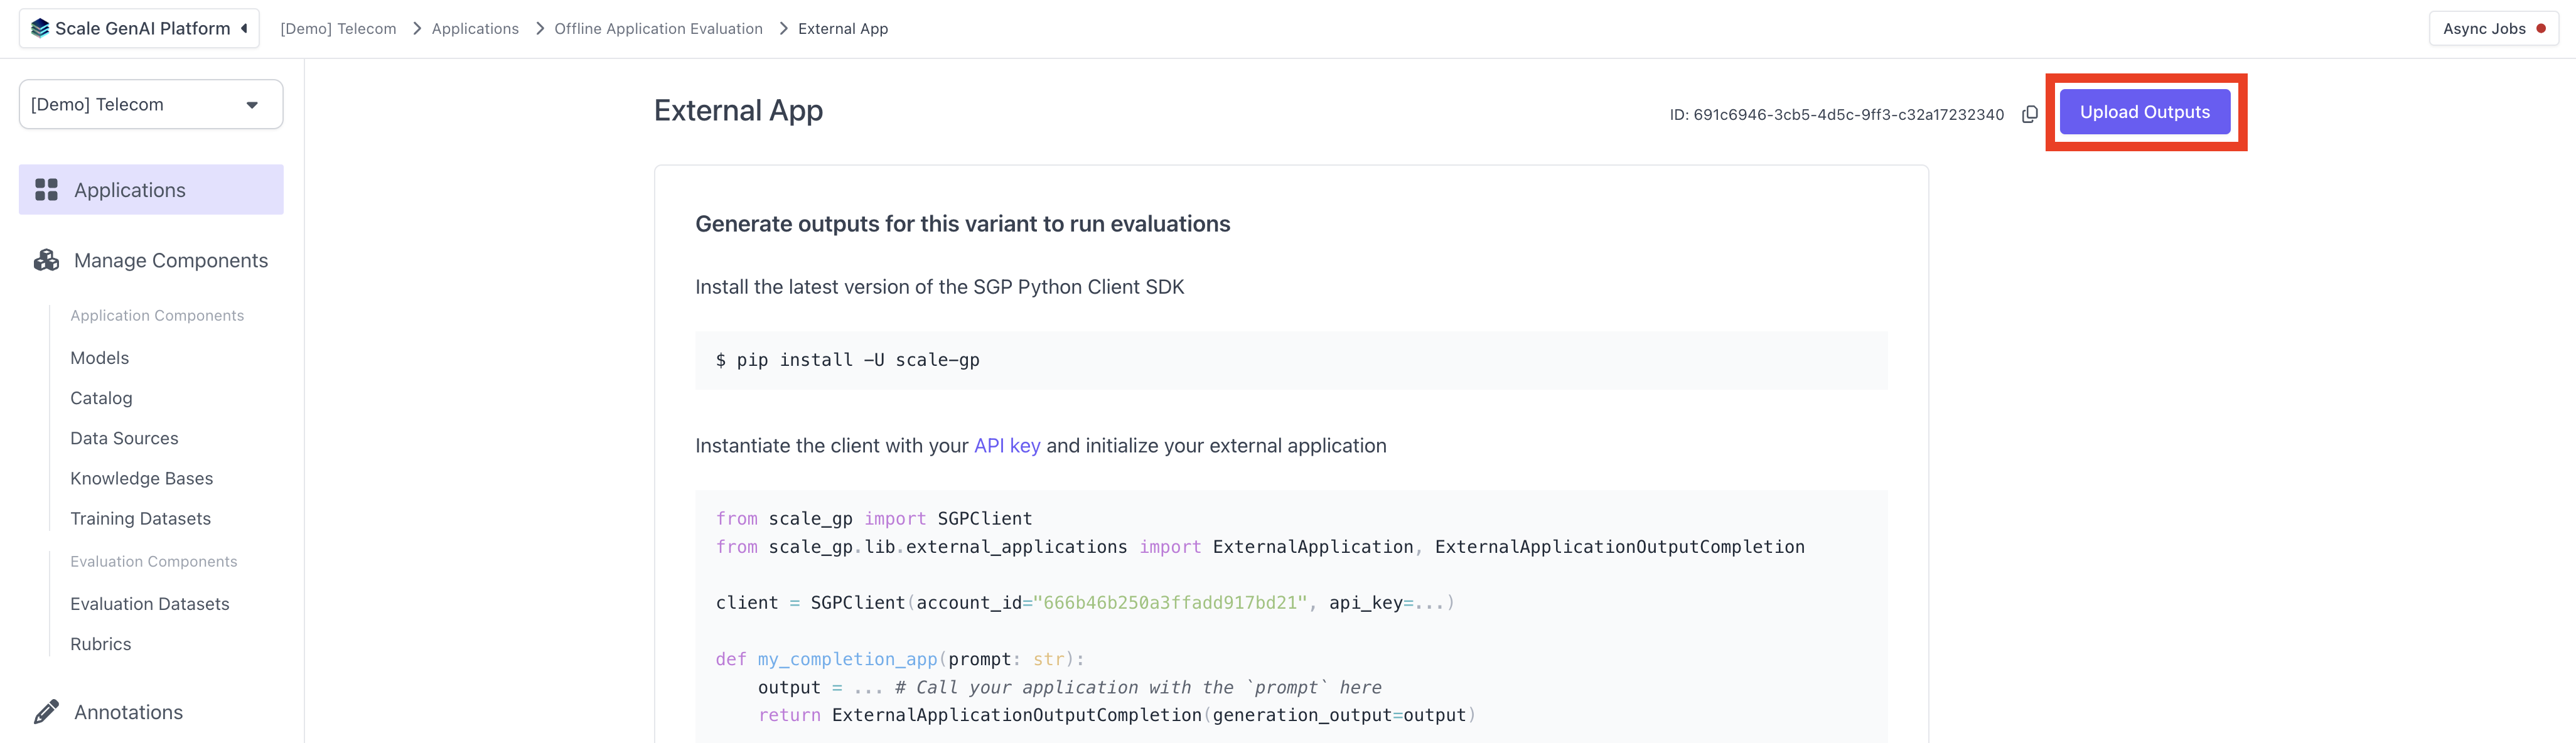
After creating the dataset, you can now upload a set of outputs for your external AI variant using this dataset. Navigate to the application variant you created previously and hit "Upload Outputs" in the top right hand corner.
## Upload Outputs
After creating the dataset, you can now upload a set of outputs for your external AI variant using this dataset. Navigate to the application variant you created previously and hit "Upload Outputs" in the top right hand corner.
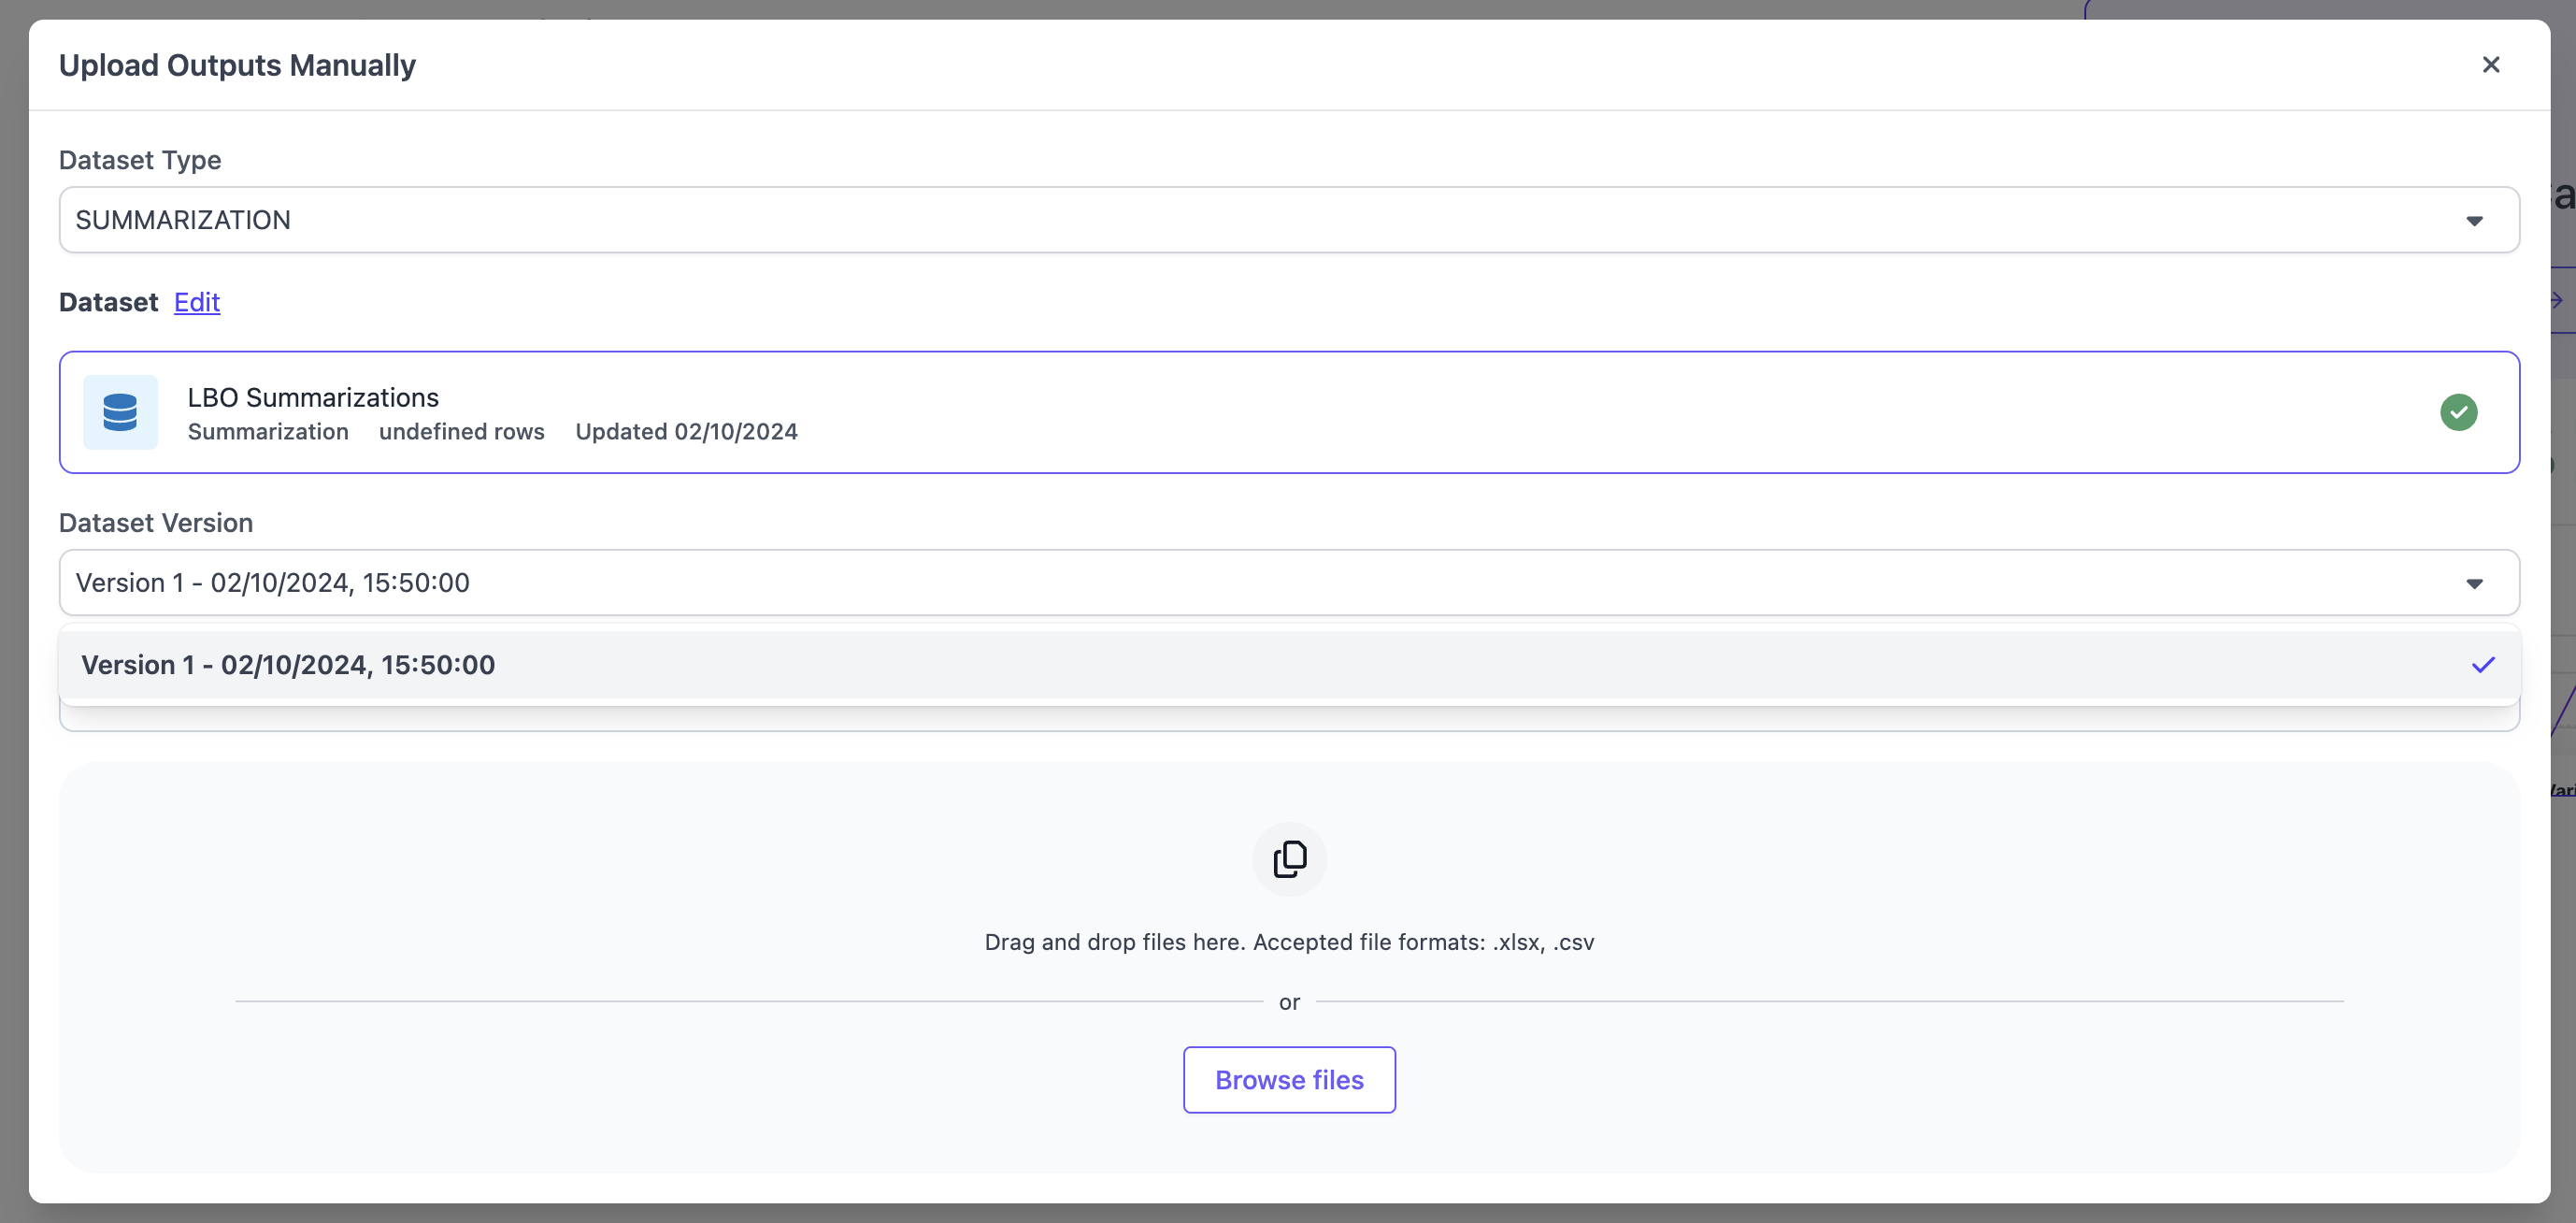
 In the modal, select `TRANSLATION` as the Dataset Type and pick a dataset that matches that schema. If the dataset has multiple version, you will have to select the version of the dataset for which you want to upload the outputs. Ensure to follow the upload instructions for the file type you are choosing. We support the same file types as for the evaluation dataset upload, `CSV`, `XSLX`, `JSON` and `JSONL`.
 ## Run Evaluation
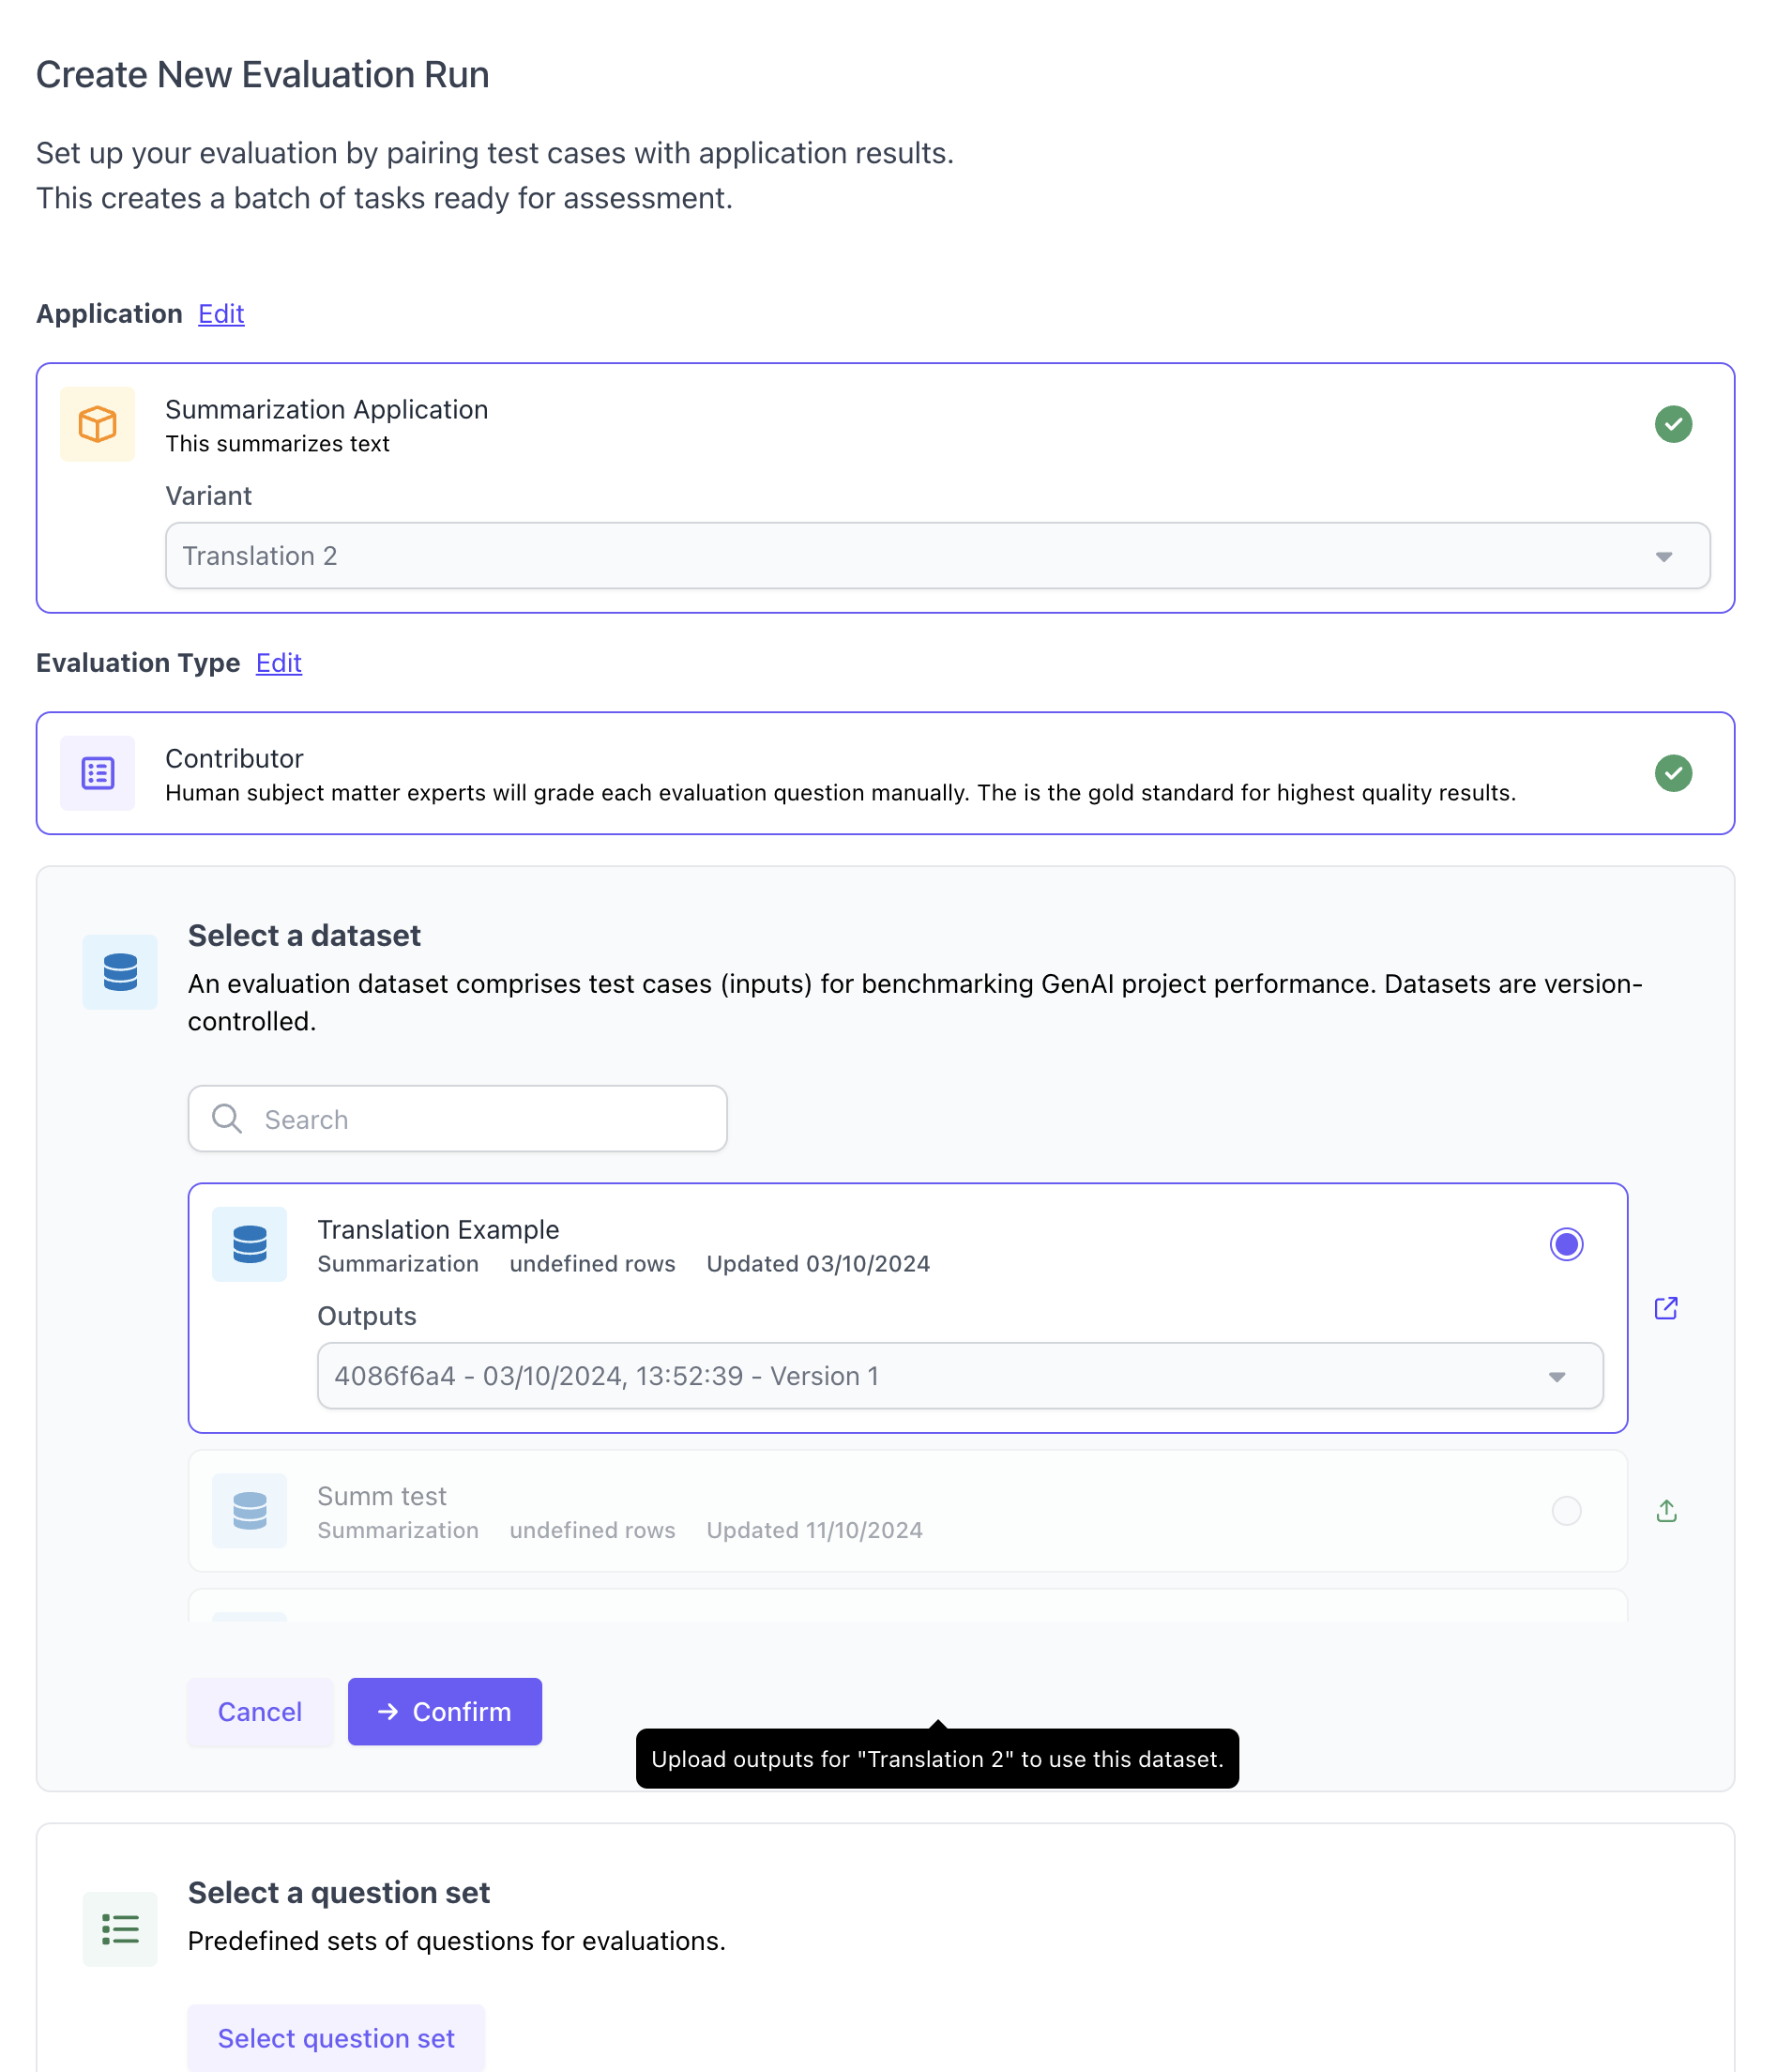
After uploading outputs, you can create a new evaluation run. You will need to select an application variant and dataset, including the set of outputs you just uploaded within the given dataset. Furthermore, you will need to select a question set. Note that currently translation evaluations only support `Contributor` evlauations and no auto-evaluation from the UI.
## Run Evaluation
After uploading outputs, you can create a new evaluation run. You will need to select an application variant and dataset, including the set of outputs you just uploaded within the given dataset. Furthermore, you will need to select a question set. Note that currently translation evaluations only support `Contributor` evlauations and no auto-evaluation from the UI.
 # Translation Evaluation using the SDK
## **Initialize the SGP client**
Follow the instructions in the [Quickstart Guide](/docs/getting-started) to setup the SGP Client. After installing the client, you can import and initialize the client as follows:
```Python theme={null}
from scale_gp import SGPClient
client = SGPClient(environment="production-multitenant")
```
## Define and upload translation test cases
The next step is to create an evaluation dataset for the translation use case.
The `TranslationTestCaseSchema` function is a helper function that allows you to quickly create a Translation Evaluation through the [flexible evaluations](/docs/flexible-evaluation/full-guide-to-flexible-evaluation) framework. This function assumes the application you want to evaluate has an orgin text and language as an input and the expected translation of the document as the expected input. It takes in inputs `origin_text`, `language`, and `expected_translation` and creates a test case object.
In order to use this function, you start by creating a list of data for your test cases. The test case data is represented as an object that contains a `origin_text` (a string containing the text you want translated), `language` (the translation language), and `expected_translation` (a string containing the expected translation).
```Python theme={null}
translation_data = [
{
origin_text: "This is a demo of a translation test case.",
language: "Japanese",
expected_translation: "これは翻訳テスト ケースのデモです。",
},
{
origin_text: "This is another demo of a translation test case.",
language: "Japanese",
expected_translation: "これは、翻訳テスト ケースの別のデモです。",
},
{
origin_text: "This is a third demo of a translation test case.",
language: "Japanese",
expected_translation: "これは、翻訳テスト ケースの 3 番目のデモです。",
},
]
```
Then, we iterate through this list and create a new list of test case objects with the data that we defined using the `TranslationTestCaseSchema` function.
```Python theme={null}
test_cases = []
for data in translation_data:
tc = TranslationTestCaseSchema(
origin_text=data["origin_text"],
language=data["language"],
expected_translation=data["expected_translation"]
)
test_cases.append(tc)
print(tc)
```
## Create the translation dataset
```Python theme={null}
from datetime import datetime
from uuid import uuid4
def timestamp():
return f"{datetime.now().strftime('%Y-%m-%d %H:%M:%S')} {uuid4()}"
dataset = DatasetBuilder(client).initialize(
account_id="your_account_id",
name=f"Translation Dataset {timestamp()}",
test_cases=test_cases
)
print(dataset)
```
## **Configure and run summarization application**
```Python theme={null}
def my_translation_app(prompt, test_case):
print(prompt['document'][:50])
start = datetime.now().replace(microsecond=5000)
return ExternalApplicationOutputFlexible(
generation_output={
"generated_translation": "GENERATED OUTPUT TRANSLATION"
},
trace_spans=[
{
"node_id": "formatting",
"start_timestamp": str(start.isoformat()),
"operation_input": {
"origin_text": "EXAMPLE INPUT TEXT"
},
"operation_output": {
"formatted_translation": "EXAMPLE OUTPUT TEXT FORMATTED"
},
"duration_ms": 1000,
}
],
metrics={"accuracy": 0.5}
)
app = ExternalApplication(client)
app.initialize(application_variant_id="your_variant_id", application=my_translation_app)
app.generate_outputs(evaluation_dataset_id=dataset.id, evaluation_dataset_version='1')
```
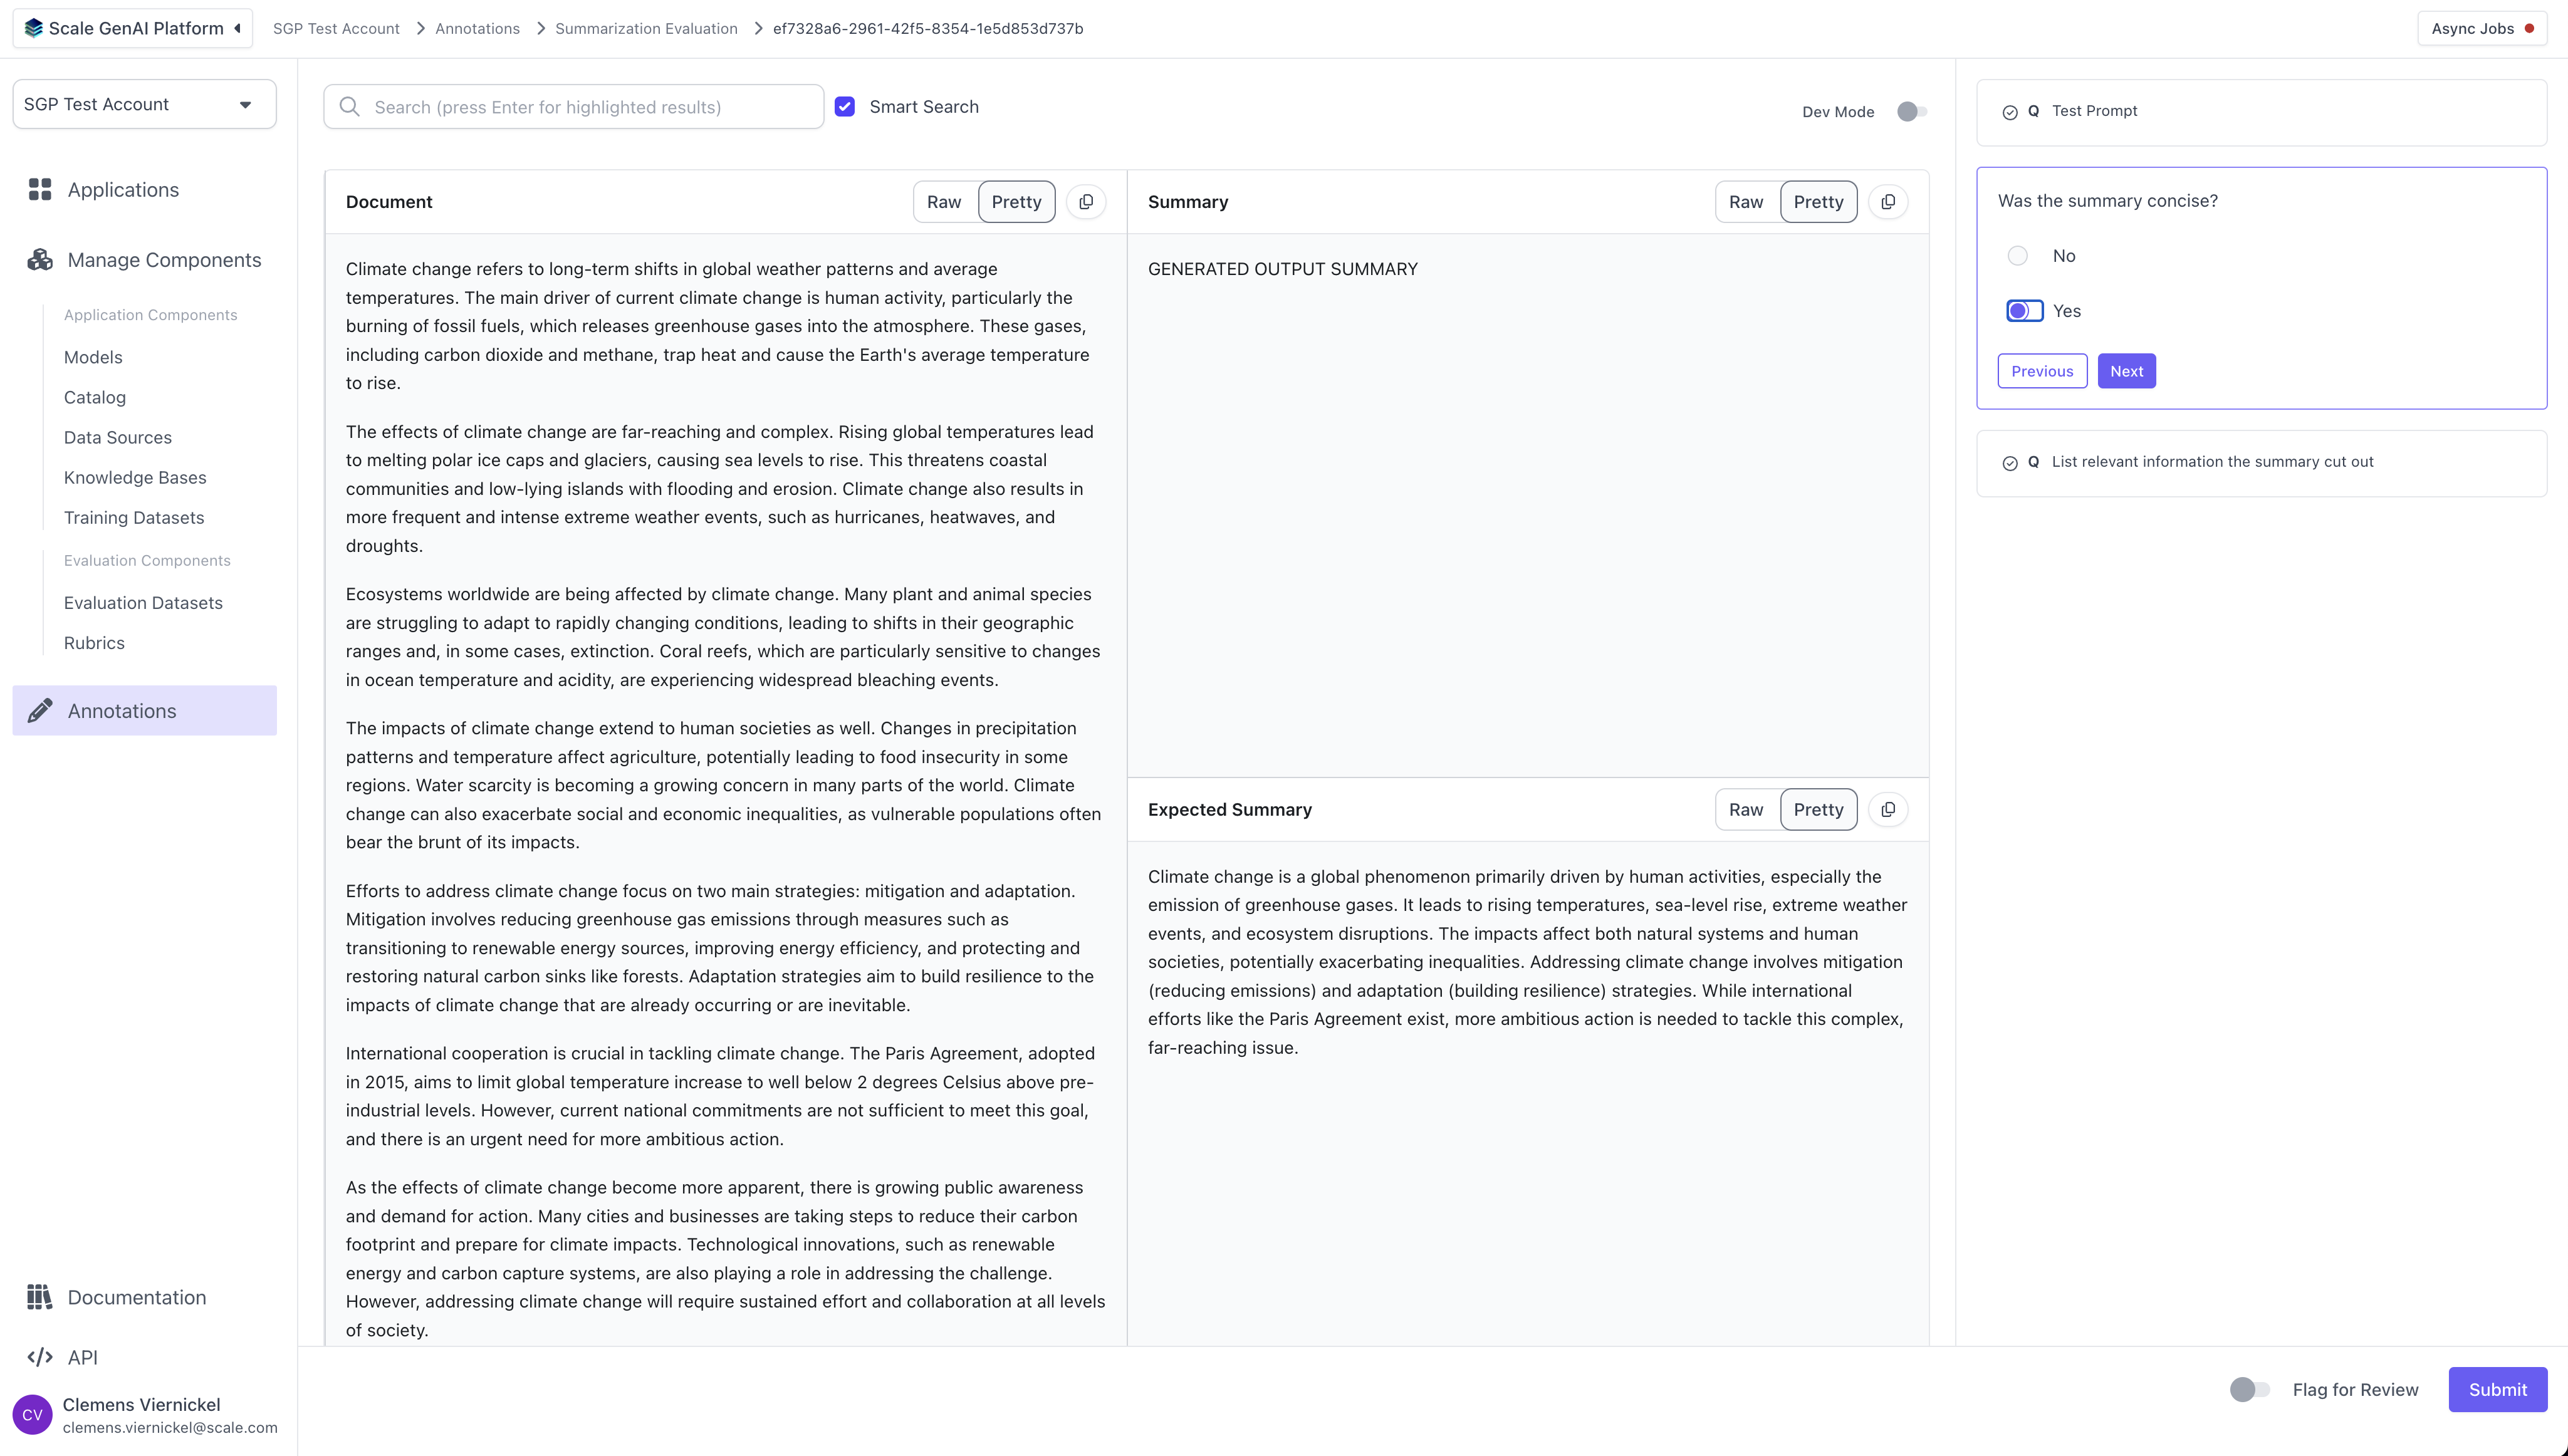
# Perform Annotations
Once the evaluation run has been created, human annotators can log into the platform and begin completing the evaluation tasks using the task dashboard.
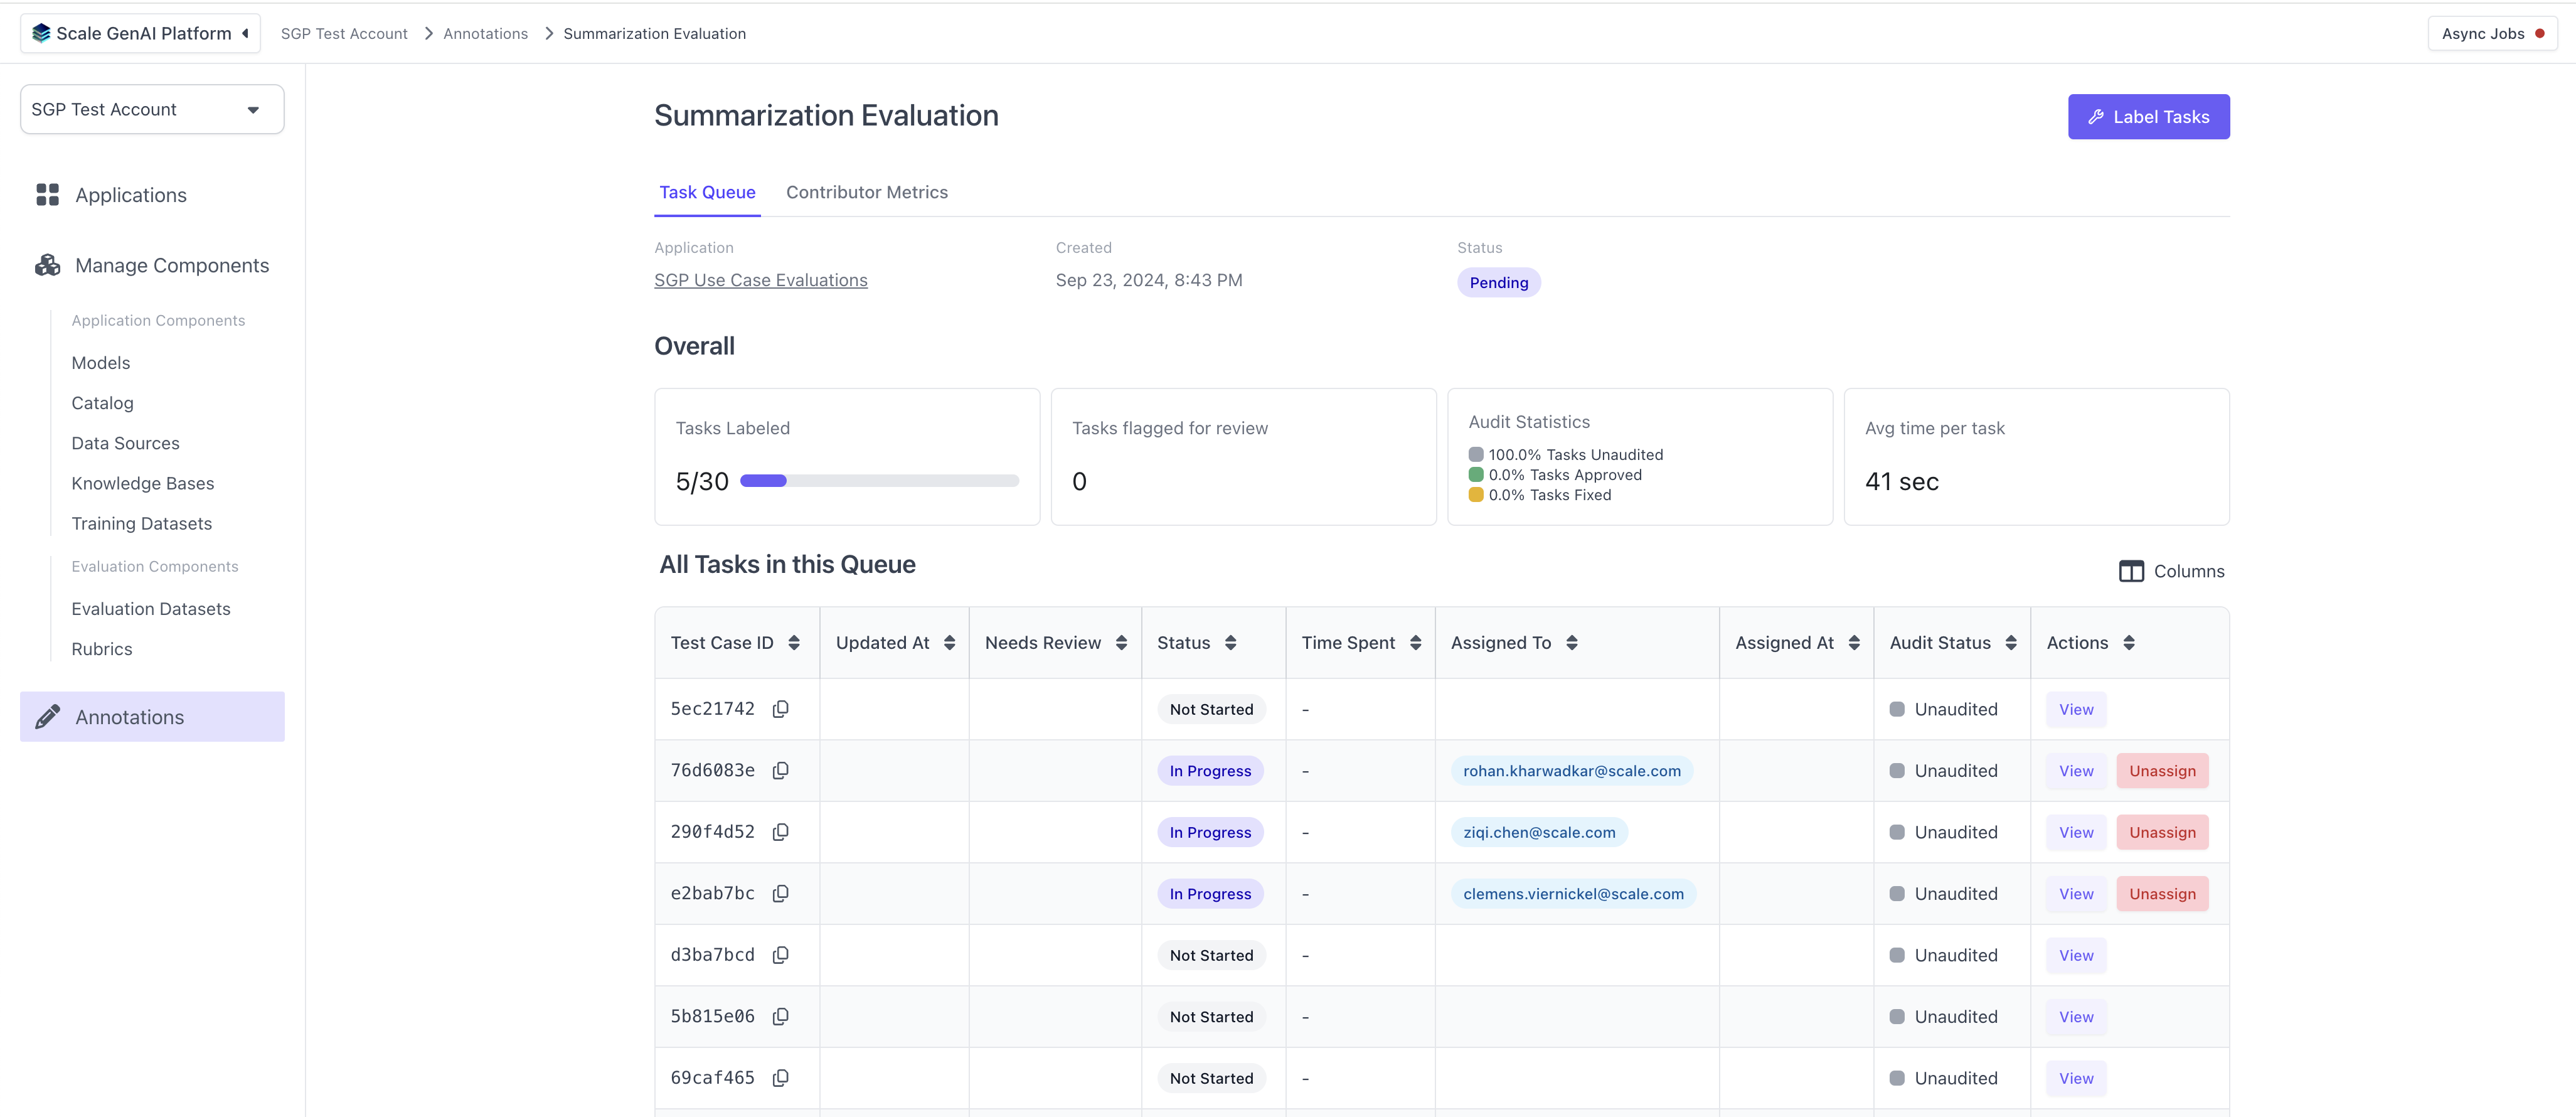
For each task, the annotators will see the layout defined by the summarization template and the questions configured in the question set.
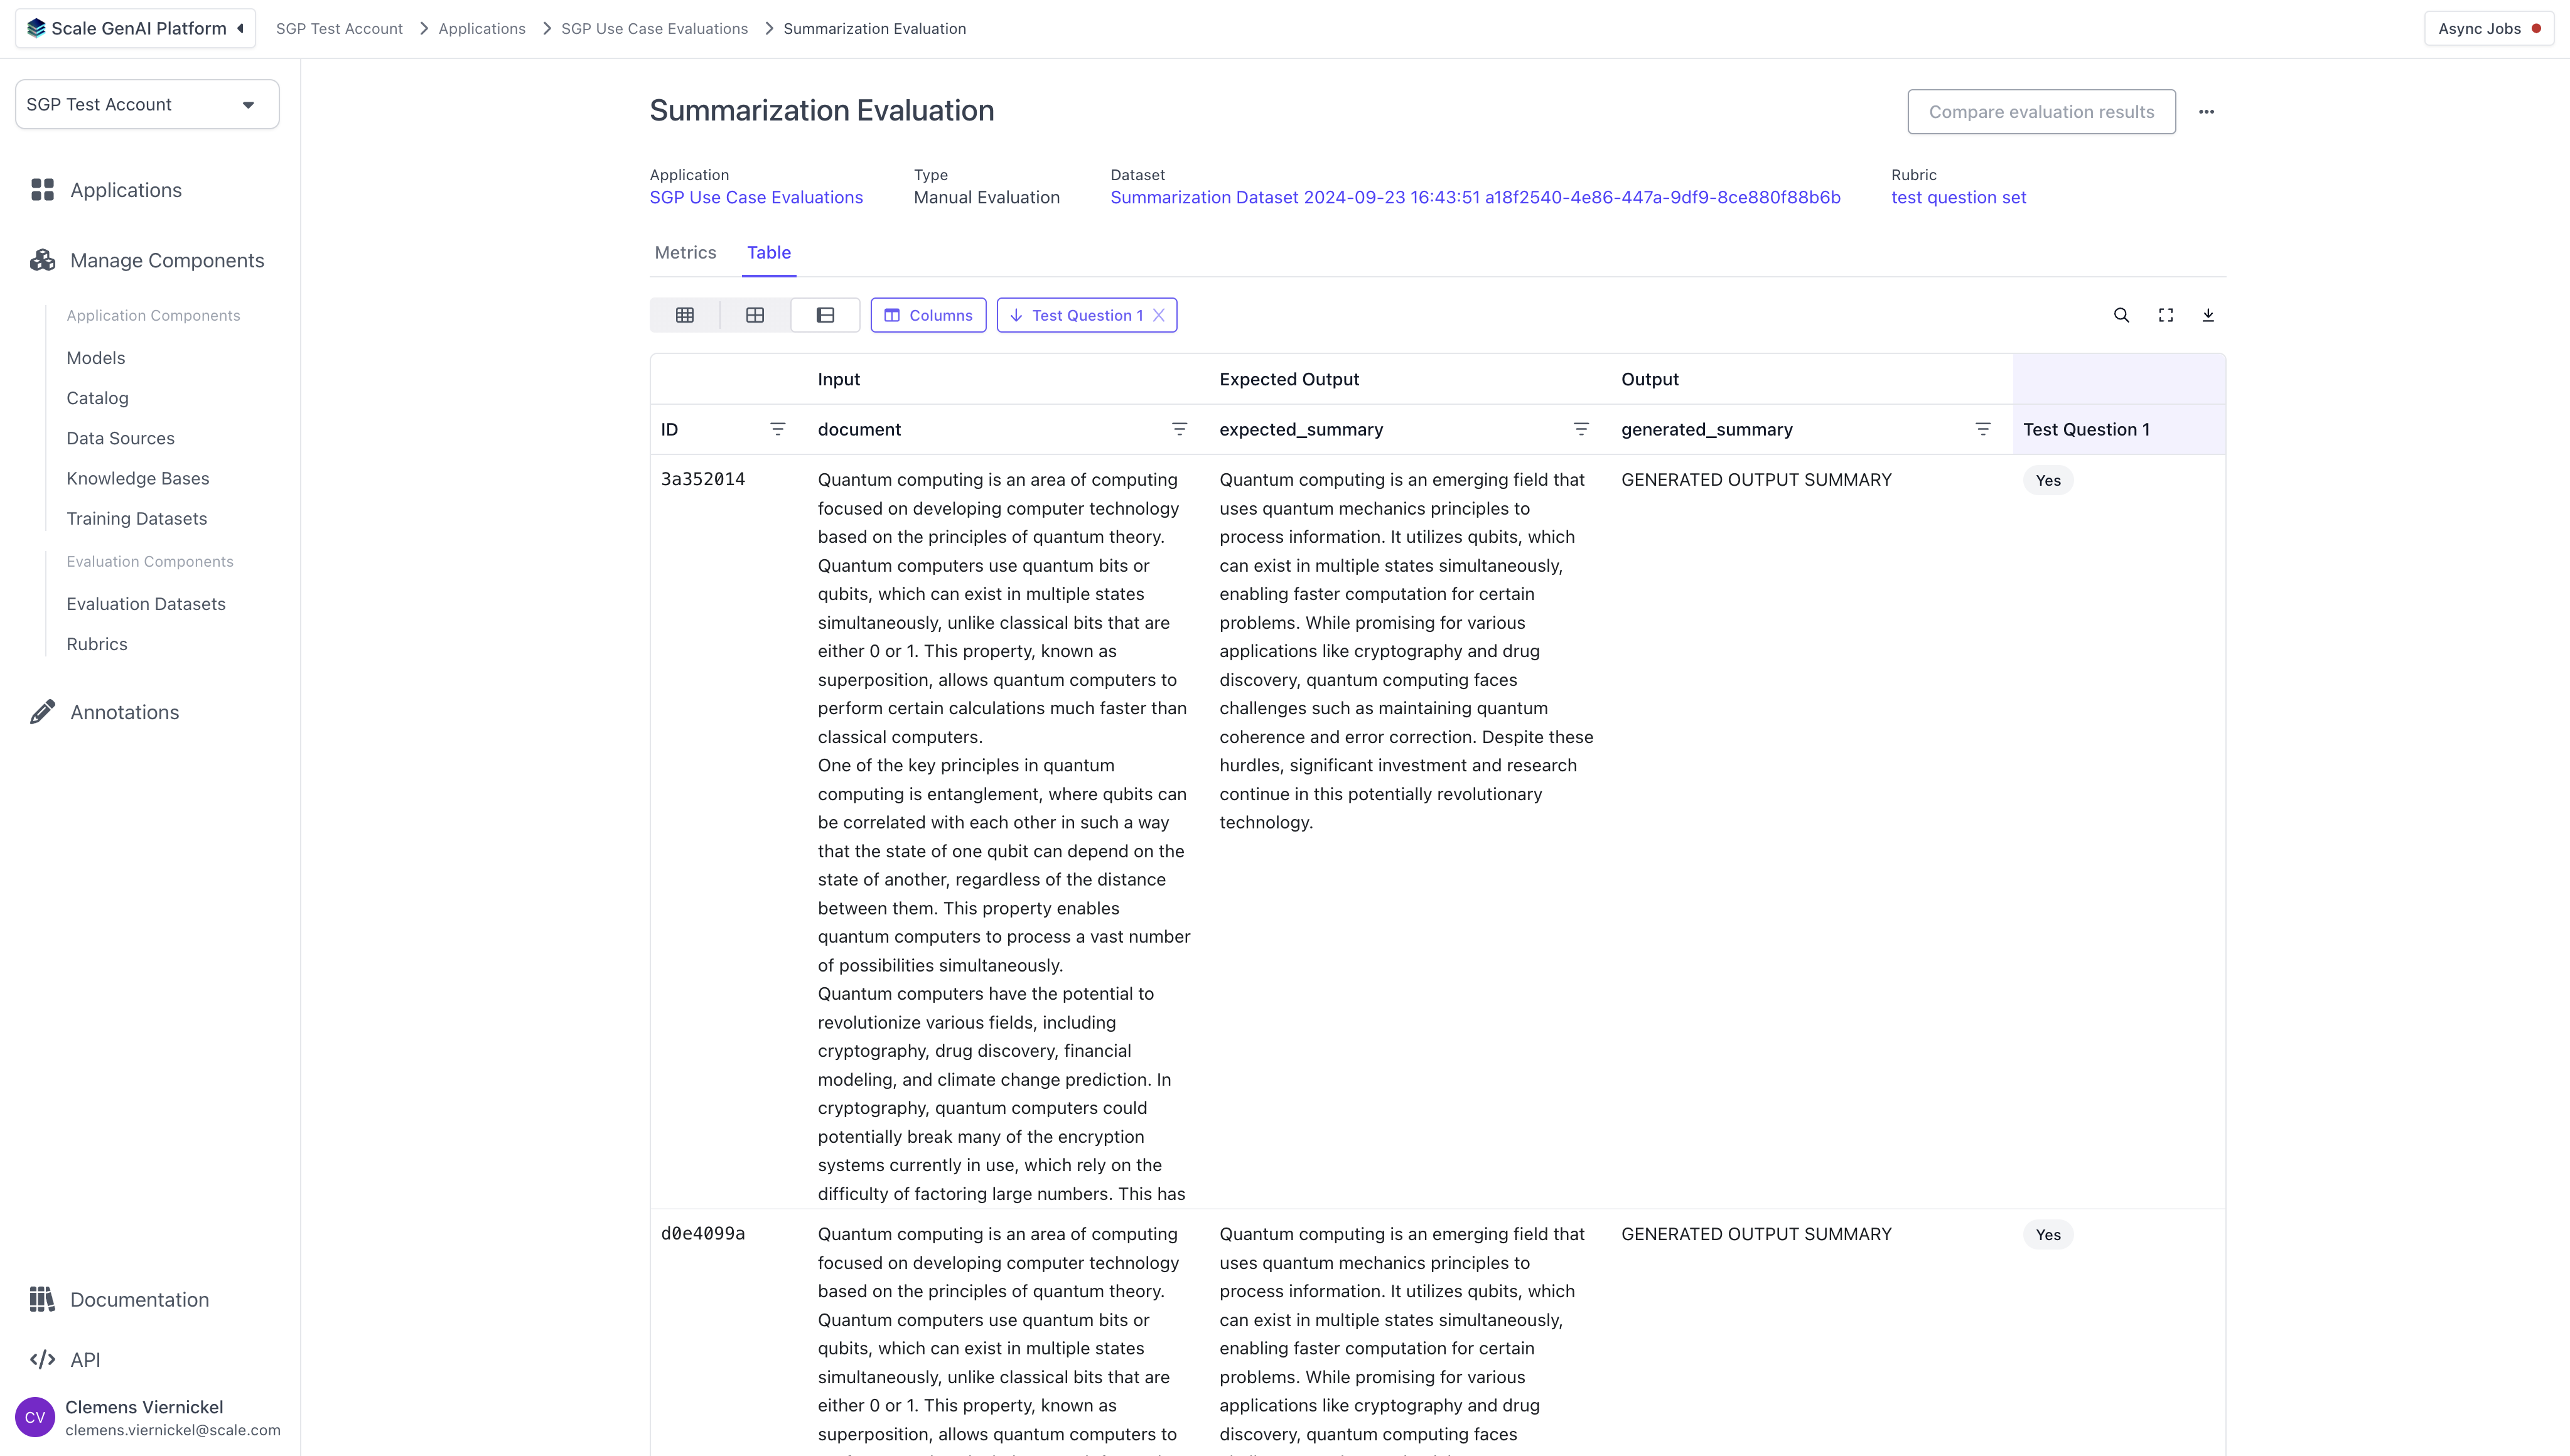
## Review Results
As the annotators complete the tasks, we can review the results of the evaluation by navigating to the respective application and clicking on the previously created evaluation run. The results are split into aggregate results and a tabular detail view with all test cases and their annotations.
# Translation Evaluation using the SDK
## **Initialize the SGP client**
Follow the instructions in the [Quickstart Guide](/docs/getting-started) to setup the SGP Client. After installing the client, you can import and initialize the client as follows:
```Python theme={null}
from scale_gp import SGPClient
client = SGPClient(environment="production-multitenant")
```
## Define and upload translation test cases
The next step is to create an evaluation dataset for the translation use case.
The `TranslationTestCaseSchema` function is a helper function that allows you to quickly create a Translation Evaluation through the [flexible evaluations](/docs/flexible-evaluation/full-guide-to-flexible-evaluation) framework. This function assumes the application you want to evaluate has an orgin text and language as an input and the expected translation of the document as the expected input. It takes in inputs `origin_text`, `language`, and `expected_translation` and creates a test case object.
In order to use this function, you start by creating a list of data for your test cases. The test case data is represented as an object that contains a `origin_text` (a string containing the text you want translated), `language` (the translation language), and `expected_translation` (a string containing the expected translation).
```Python theme={null}
translation_data = [
{
origin_text: "This is a demo of a translation test case.",
language: "Japanese",
expected_translation: "これは翻訳テスト ケースのデモです。",
},
{
origin_text: "This is another demo of a translation test case.",
language: "Japanese",
expected_translation: "これは、翻訳テスト ケースの別のデモです。",
},
{
origin_text: "This is a third demo of a translation test case.",
language: "Japanese",
expected_translation: "これは、翻訳テスト ケースの 3 番目のデモです。",
},
]
```
Then, we iterate through this list and create a new list of test case objects with the data that we defined using the `TranslationTestCaseSchema` function.
```Python theme={null}
test_cases = []
for data in translation_data:
tc = TranslationTestCaseSchema(
origin_text=data["origin_text"],
language=data["language"],
expected_translation=data["expected_translation"]
)
test_cases.append(tc)
print(tc)
```
## Create the translation dataset
```Python theme={null}
from datetime import datetime
from uuid import uuid4
def timestamp():
return f"{datetime.now().strftime('%Y-%m-%d %H:%M:%S')} {uuid4()}"
dataset = DatasetBuilder(client).initialize(
account_id="your_account_id",
name=f"Translation Dataset {timestamp()}",
test_cases=test_cases
)
print(dataset)
```
## **Configure and run summarization application**
```Python theme={null}
def my_translation_app(prompt, test_case):
print(prompt['document'][:50])
start = datetime.now().replace(microsecond=5000)
return ExternalApplicationOutputFlexible(
generation_output={
"generated_translation": "GENERATED OUTPUT TRANSLATION"
},
trace_spans=[
{
"node_id": "formatting",
"start_timestamp": str(start.isoformat()),
"operation_input": {
"origin_text": "EXAMPLE INPUT TEXT"
},
"operation_output": {
"formatted_translation": "EXAMPLE OUTPUT TEXT FORMATTED"
},
"duration_ms": 1000,
}
],
metrics={"accuracy": 0.5}
)
app = ExternalApplication(client)
app.initialize(application_variant_id="your_variant_id", application=my_translation_app)
app.generate_outputs(evaluation_dataset_id=dataset.id, evaluation_dataset_version='1')
```
# Perform Annotations
Once the evaluation run has been created, human annotators can log into the platform and begin completing the evaluation tasks using the task dashboard.

For each task, the annotators will see the layout defined by the summarization template and the questions configured in the question set.

## Review Results
As the annotators complete the tasks, we can review the results of the evaluation by navigating to the respective application and clicking on the previously created evaluation run. The results are split into aggregate results and a tabular detail view with all test cases and their annotations.
